nf-core/phaseimpute
A bioinformatics pipeline to phase and impute genetic data
Introduction
The nf-core/phaseimpute pipeline is designed to perform genomic phasing and imputation techniques. Some key functionalities include chromosome checking, panel preparation, imputation, simulation, and concordance.
Samplesheet input
You will need to create a samplesheet with information about the samples you would like to analyse before running the pipeline. Use the --input parameter to specify its location. It has to be a comma-separated file with 3 columns, and a header row as shown in the examples below.
--input '[path to samplesheet file]'Structure
The samplesheet can have as many columns as you desire. However, there is a strict requirement for at least 3 columns to match those defined in the table below.
A final samplesheet file may look something like the one below. This is for 6 samples.
sample,file,indexSAMPLE1,AEG588A1.bam,AEG588A1.baiSAMPLE2,AEG588A2.bam,AEG588A2.baiSAMPLE3,AEG588A3.bam,AEG588A3.bai| Column | Description |
|---|---|
sample |
Custom sample name. Spaces in sample names are automatically converted to underscores (_). |
file |
Full path to an alignment or variant file. File has to have the extension “.bam”, “.cram” or “.vcf”, “.bcf” and optionally compressed with bgzip “.gz”. All files in this column need to have the same extension. |
index |
Full path to index file. File has to be have the extension “.bai”, “.crai”, “csi”, or “tbi”. All files in this column need to have the same extension. |
An example samplesheet has been provided with the pipeline.
Samplesheet reference panel
You will need to create a samplesheet with information about the reference panel you would like to use. Use the --panel parameter to specify its location. It has to be a comma-separated file with 3 columns, and a header row as shown in the examples below.
--panel '[path to samplesheet file]'Structure
A final samplesheet file for the reference panel may look something like the one below. This is for 3 chromosomes.
panel,chr,vcf,index1000G,chr1,ALL.chr1.phase3_shapeit2_mvncall_integrated_v5a.20130502.genotypes.vcf.gz, ALL.chr1.phase3_shapeit2_mvncall_integrated_v5a.20130502.genotypes.vcf.gz.tbi1000G,chr2,ALL.chr2.phase3_shapeit2_mvncall_integrated_v5a.20130502.genotypes.vcf.gz, ALL.chr2.phase3_shapeit2_mvncall_integrated_v5a.20130502.genotypes.vcf.gz.tbi1000G,chr3,ALL.chr3.phase3_shapeit2_mvncall_integrated_v5a.20130502.genotypes.vcf.gz, ALL.chr3.phase3_shapeit2_mvncall_integrated_v5a.20130502.genotypes.vcf.gz.tbi| Column | Description |
|---|---|
panel |
Name of the reference panel used. |
chr |
Name of the chromosome. Use the prefix ‘chr’ if the panel uses the prefix. |
vcf |
Full path to a VCF file for that chromosome. File has to be gzipped and have the extension “.vcf.gz”. |
index |
Full path to the index for VCF file for that chromosome. File has to be gzipped and have the extension “.tbi”. |
An example samplesheet has been provided with the pipeline.
Samplesheet posfile
You will need a samplesheet with conversion of the reference panel or informations about the variants to use the --steps [impute,validate]. You can generate this samplesheet from --steps panelprep. Use the --posfile parameter to specify its location. It has to be a comma-separated file with at least 2 columns (i.e., panel and chr), and a header row as shown in the examples below.
--posfile '[path to samplesheet file]'Structure
A final samplesheet file for the posfile may look something like the one below. This is for 2 chromosomes.
panel,chr,vcf,index,hap,legend,posfile1000GP.s.norel,chr21,1000GP.chr21.s.norel.sites.vcf.gz,1000GP.chr21.s.norel.sites.vcf.gz.csi,1000GP.s.norel_chr21.hap.gz,1000GP.s.norel_chr21.legend.gz,1000GP.s.norel_chr21.posfile.gz1000GP.s.norel,chr22,1000GP.chr22.s.norel.sites.vcf.gz,1000GP.chr22.s.norel.sites.vcf.gz.csi,1000GP.s.norel_chr22.hap.gz,1000GP.s.norel_chr22.legend.gz,1000GP.s.norel_chr22.posfile.gz| Column | Description |
|---|---|
panel |
Name of the reference panel used. |
chr |
Name of the chromosome. Use the prefix ‘chr’ if the panel uses the prefix. |
vcf |
Full path to a VCF containing the sites for that chromosome. File has to be gzipped and have the extension “.vcf.gz”. (Required for validation step) |
index |
Full path to the index for the VCF file for that chromosome. File has to be gzipped and have the extension “.tbi”. (Necessary for validation step) |
hap |
Full path to “.hap.gz” compressed file containing the reference panel haplotypes in “haps” format. (Required by QUILT) |
legend |
Full path to “.legend.gz” compressed file containing the reference panel sites in “legend” format. (Required by QUILT) |
posfile |
Full path to “.posfile.gz” optionally compressed file containing position of variants to impute in “–targets-file” format of bcftools: ‘%CHROM\t%POS\t%REF,%ALT\n’ with no header. (Required by GLIMPSE1, STITCH and validation step) |
The legend file should be a TSV with the following structure, similar to that from bcftools convert documentation with the --haplegendsample command : File is space separated with a header (“id,position,a0,a1”), one row per SNP, with the following columns:
- Column 1: chromosome:position_ref allele_alternate allele
- Column 2: physical position (sorted from smallest to largest)
- Column 3: reference base
- Column 4: alternate base
id position a0 a1chr21:16609287_C_T 16609287 C Tchr21:16609295_T_G 16609295 T Gchr21:16609345_A_T 16609345 A Tchr21:16609400_C_A 16609400 C Achr21:16609437_G_A 16609437 G Achr21:16609443_C_T 16609443 C Tchr21:16609476_A_G 16609476 A Gchr21:16609525_T_A 16609525 T AThe posfile file should be a TSV with the following structure, similar to that from “–targets-file” format of bcftools : File is tab separated with no header, one row per SNP, with the following columns:
- Column 1: chromosome
- Column 2: physical position (sorted from smallest to largest)
- Column 3: reference base,alternate base
chr21 16609287 C,Tchr21 16609295 T,Gchr21 16609345 A,Tchr21 16609400 C,Achr21 16609437 G,Achr21 16609443 C,Tchr21 16609476 A,Gchr21 16609525 T,ASamplesheet genetic map
To improve imputation quality, you can optionally provide a genetic map. This allows all imputation and phasing softwares used in nf-core/phaseimpute to better estimate recombination rates across each chromosome. These genetic maps can be obtained from public resources such as the HapMap Project, some imputation softwares like BEAGLE5 or directly from scientific publications (e.g. for dogs: Auton et al. 2013).
Use the --map parameter to specify the location of the genetic map file. The file must be a comma-separated table with at least two columns and a header row, as shown below:
--map '[path to samplesheet file]'Structure
A typical genetic map samplesheet contains one row per chromosome. For example, a file specifying maps for two chromosomes might look like this:
chr,mapchr21,GRCh38_chr21.glimpse.mapchr22,GRCh38_chr22.glimpse.mapGenetic map files are available in various formats, so an autoconversion module has been implemented in the pipeline. This autoconversion script will create the same map in 4 different format to be used by all the different imputation and phasing software. You only need to provide map file that verify the following:
- be a text file (compressed or uncompressed)
- separated by comma, semicolon, space or tabulation
- one file by chromosome
- contain at least the following two columns (with
_being a non alphanumeric character):pos: physical position (base pairs), can be named: pos, position or bpcm: genetic position (centiMorgans), can be named: cm or genetic_map_cm
- additional optional columns include:
chr: chromosome name, can be named: _chr, chrom or chromosomeid: variant identifier, can be named: id, snp, marker or rsid
- if no header provided:
- if three columns should be, strictly in this order: chr, pos, cm (minimac format)
- if four columns should be, strictly in this order: chr, id, cm, pos (plink format)
Some example files used for our unittests can be found in nf-core/test-datasets.
Samplesheet region
You can provide a samplesheet with information about the chromosomal region you want to process. These regions will be used to:
- filter input BAM files during downsampling,
- select regions for phasing when processing the reference panel,
- filter chromosome chunks for imputation,
- restrict the region used for statistics in simulation and validation.
Use the --input_region parameter to specify its location. It has to be a comma-separated file with 3 columns (i.e., chr, start, end), and a header row as shown in the examples below. Only one region per chromosome is accepted.
--input_region '[path to samplesheet file]'If not provided, the fasta index will be necessary to get each chromosome length. This fasta index can be directly provided by the --fasta_fai parameter, obtained through --genome or computed from the --fasta file.
Structure
A samplesheet file for the input regions look like the one below. This is for 2 chromosomes.
chr,start,endchr21,16570000,16610000chr22,16570000,16610000| Column | Description |
|---|---|
chr |
Name of the chromosome. Use the prefix ‘chr’ if the panel uses the prefix. |
start |
Region start position in base pair. |
end |
Region end position in base pair. |
Samplesheet chunks
You will need a samplesheet with information about the chromosomes chunks to perform imputation on for --steps impute. You can generate this samplesheet from --steps panelprep. Use the --chunks parameter to specify its location. It has to be a comma-separated file with 3 columns (i.e., panel, chr, file), and a header row as shown in the examples below.
If not provided the full region per chromosome will be used instead. See region section for more information.
--chunks '[path to samplesheet file]'Structure
A final samplesheet file for the chunks may look something like the one below. This is for 2 chromosomes.
panel,chr,file1000GP.s.norel,chr21,1000GP.chr21_chunks.txt1000GP.s.norel,chr22,1000GP.chr22_chunks.txt| Column | Description |
|---|---|
panel |
Name of the reference panel used. |
chr |
Name of the chromosome. Use the prefix ‘chr’ if the panel uses the prefix. |
file |
Full path to a txt file containing the different chunks with and without buffer for each chromosome |
The file should be a TSV with the following structure, similar to that from GLIMPSE_chunk documentation: File is tab separated with no header, one row per chunk, with the following columns:
- Column 1: chunk id
- Column 2: chromosome name
- Column 3: region without buffer
- Column 4: region with buffer
- Column 5: region size in bp
- Column 6: number of variants
0 chr22 chr22:16570065-16597215 chr22:16570065-16592216 22152 4521 chr22 chr22:16587172-16609999 chr22:16592229-16609999 17771 451Samplesheet map
You will need to create a samplesheet with information about the genetic map you would like to use.
This genetic map is used by the different phasing and imputation software to better estimate the recombination rate along each chromosome.
See the summary table of required parameters in --steps impute to know which tools support it.
Use the --map parameter to specify its location.
It has to be a comma-separated file with 2 columns (i.e., chr, map), and a header row as shown in the examples below.
--map '[path to samplesheet file]'Structure
A final samplesheet file for the reference panel may look something like the one below. This is for 2 chromosomes.
chr,mapchr21,GRCh38_chr21.plink.mapchr22,GRCh38_chr22.plink.map| Column | Description |
|---|---|
chr |
Name of the chromosome. Use the prefix ‘chr’ if the panel uses the prefix. |
map |
Full path to the genetic map to use. |
The genetic map file should be a TSV with the following structure, similar to that from plink documentation: File is space separated with no header, with the following columns:
- Column 1: chromosome name
- Column 2: variant id
- Column 3: position in centiMorgans
- Column 4: base-pair coordinate
chr21 . 0.584144 10326676chr21 . 0.584144 12968320chr21 . 0.585474 12970435chr21 . 0.589953 12977762chr21 . 0.5932 12983047chr21 . 0.594723 12985513Reference genome
Remember to use the same reference genome for all the files. You can specify the reference genome using:
--genome GRCh37or you can specify a custom genome using:
--fasta Homo_sapiens.GRCh38.dna_sm.primary_assembly.fa.gz--fasta_fai Homo_sapiens.GRCh38.dna_sm.primary_assembly.fa.gz.faiRunning the pipeline: quick example
A quick running example only with the imputation step can be performed as follows:
nextflow run nf-core/phaseimpute \ --input samplesheet.csv \ --steps impute \ --chunks chunks.csv \ --posfile posfile_legend.csv \ --outdir results \ --genome GRCh38 \ --panel panel.csv \ --tools glimpse1 \ -profile dockerThe typical command for running the pre-processing of the panel and imputation of samples is shown below:
nextflow run nf-core/phaseimpute \ --input samplesheet.csv \ --steps panelprep,impute \ --outdir results \ --genome GRCh37 \ -profile dockerThis will launch the pipeline, preparing the reference panel and performing imputation, with the docker configuration profile. See below for more information about profiles.
Note that the pipeline will create the following files in your working directory:
work # Directory containing the nextflow working files<OUTDIR> # Finished results in specified location (defined with --outdir).nextflow_log # Log file from Nextflow# Other nextflow hidden files, eg. history of pipeline runs and old logs.To facilitate multiple runs of the pipeline with consistent settings without specifying each parameter in the command line, you can use a parameter file. This allows for setting parameters once and reusing them across different executions.
Pipeline settings can be provided in a yaml or json file via -params-file <file>.
Do not use -c <file> to specify parameters as this will result in errors. Custom config files specified with -c must only be used for tuning process resource specifications, other infrastructural tweaks (such as output directories), or module arguments (args).
The above pipeline run specified with a params file in yaml format:
nextflow run nf-core/phaseimpute -profile docker -params-file params.yamlwith:
input: './samplesheet.csv'outdir: './results/'genome: 'GRCh37'<...>Do not use -c <file> to specify parameters as this will result in errors. Custom config files specified with -c must only be used for tuning process resource specifications, other infrastructural tweaks (such as output directories), or module arguments (args).
You can also generate YAML or JSON files easily using the nf-core/launch tool, which guides you creating the files that can be used directly with -params-file.
Running with the tests profile
Multiple tests profiles are available to test the different functionalities of the pipeline on a small dataset. The different tests profiles are:
test: A profile to evaluate the imputation step with theglimpse1tool.test_glimpse2: A profile to evaluate the imputation step with theglimpse2tool.test_quilt: A profile to evaluate the imputation step with thequilttool.test_quilt2: A profile to evaluate the imputation step with thequilt2tool.test_stitch: A profile to evaluate the imputation step with thestitchtool.test_beagle5: A profile to evaluate the imputation step with thebeagle5tool.test_minimac4: A profile to evaluate the imputation step with theminimac4tool.test_panelprep: A profile to evaluate the panel preparation step.test_sim: A profile to evaluate the simulation step.test_validate: A profile to evaluate the validation step.test_batch: A profile to evaluate the imputation and validation steps of the pipeline while splitting the input in different batch.test_dog: A profile to evaluate the panel preparation and imputation steps on dog samples usingglimpse1,glimpse2andquilttools.test_all: A profile with a complete configuration to evaluate all the steps of the pipeline.test_all_fullchr: A profile with a complete configuration to evaluate all the steps of the pipeline on the full size chromosomes 21 and 22.test_full: A profile with a complete configuration to evaluate all the steps of the pipeline on the whole genome.
Each test can be run with the following command:
nextflow run nf-core/phaseimpute -profile <test,test_glimpse2,test_quilt,...>,<singularity,docker,conda> --outdir resultsRunning the pipeline: detailed instructions
nf-core/phaseimpute can be started at different points in the analysis by setting the flag --steps and the available options [simulate, panelprep, impute, validate, all]. You can also run several steps simultaneously by listing the required processes as --steps panelprep,impute or you can choose to run all steps sequentially by using --steps all.
Start with simulation --steps simulate
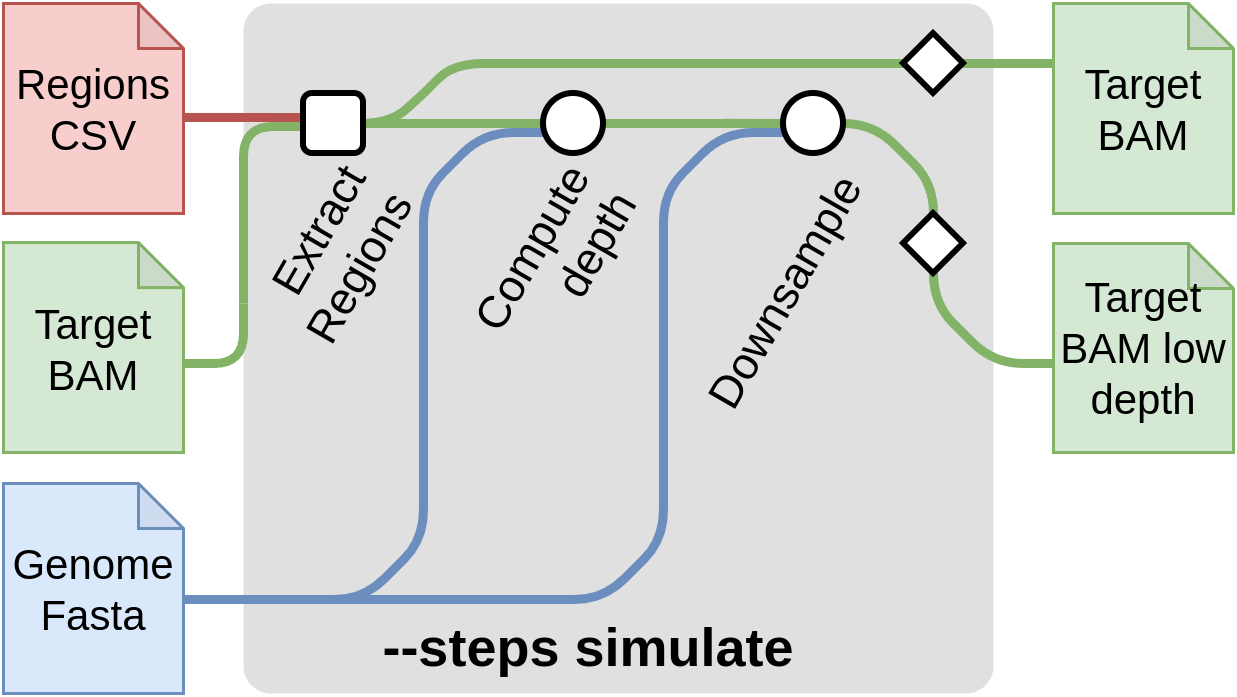
This step of the pipeline allows to create synthetic low-coverage input files by downsizing high density input data. A typical use case is to obtain low-coverage input data from a sequenced sample. This method is useful for comparing the imputation results to a truth dataset and evaluate the quality of the imputation. The truth file for each sample here, is obtained by calling the variants from the high density input data provided it can also be provided through --input-truth CSV samplesheet. You can skip these steps if you already have low-pass genome sequencing data.
A sample command for this steps is:
nextflow run nf-core/phaseimpute \ --input samplesheet.csv \ --steps simulate \ --depth 1 \ --outdir results \ --genome GRCh37 \ -profile dockerThe required flags for this mode are:
--steps simulate: The steps to run.--input samplesheet.csv: The samplesheet containing the input sample files inbamorcramformat.--depth: The final depth of the file [default: 1].--genomeor--fasta: The reference genome of the samples.
If your input files encompass only a portion of chromosomes, please provide the exact regions in the regions samplesheet. If not provided, the input data coverage estimation will be underestimate and will either result in an error or in erroneous resulting depth.
You can find an overview of the results produced by this step in the Output.
Start with panel preparation --steps panelprep
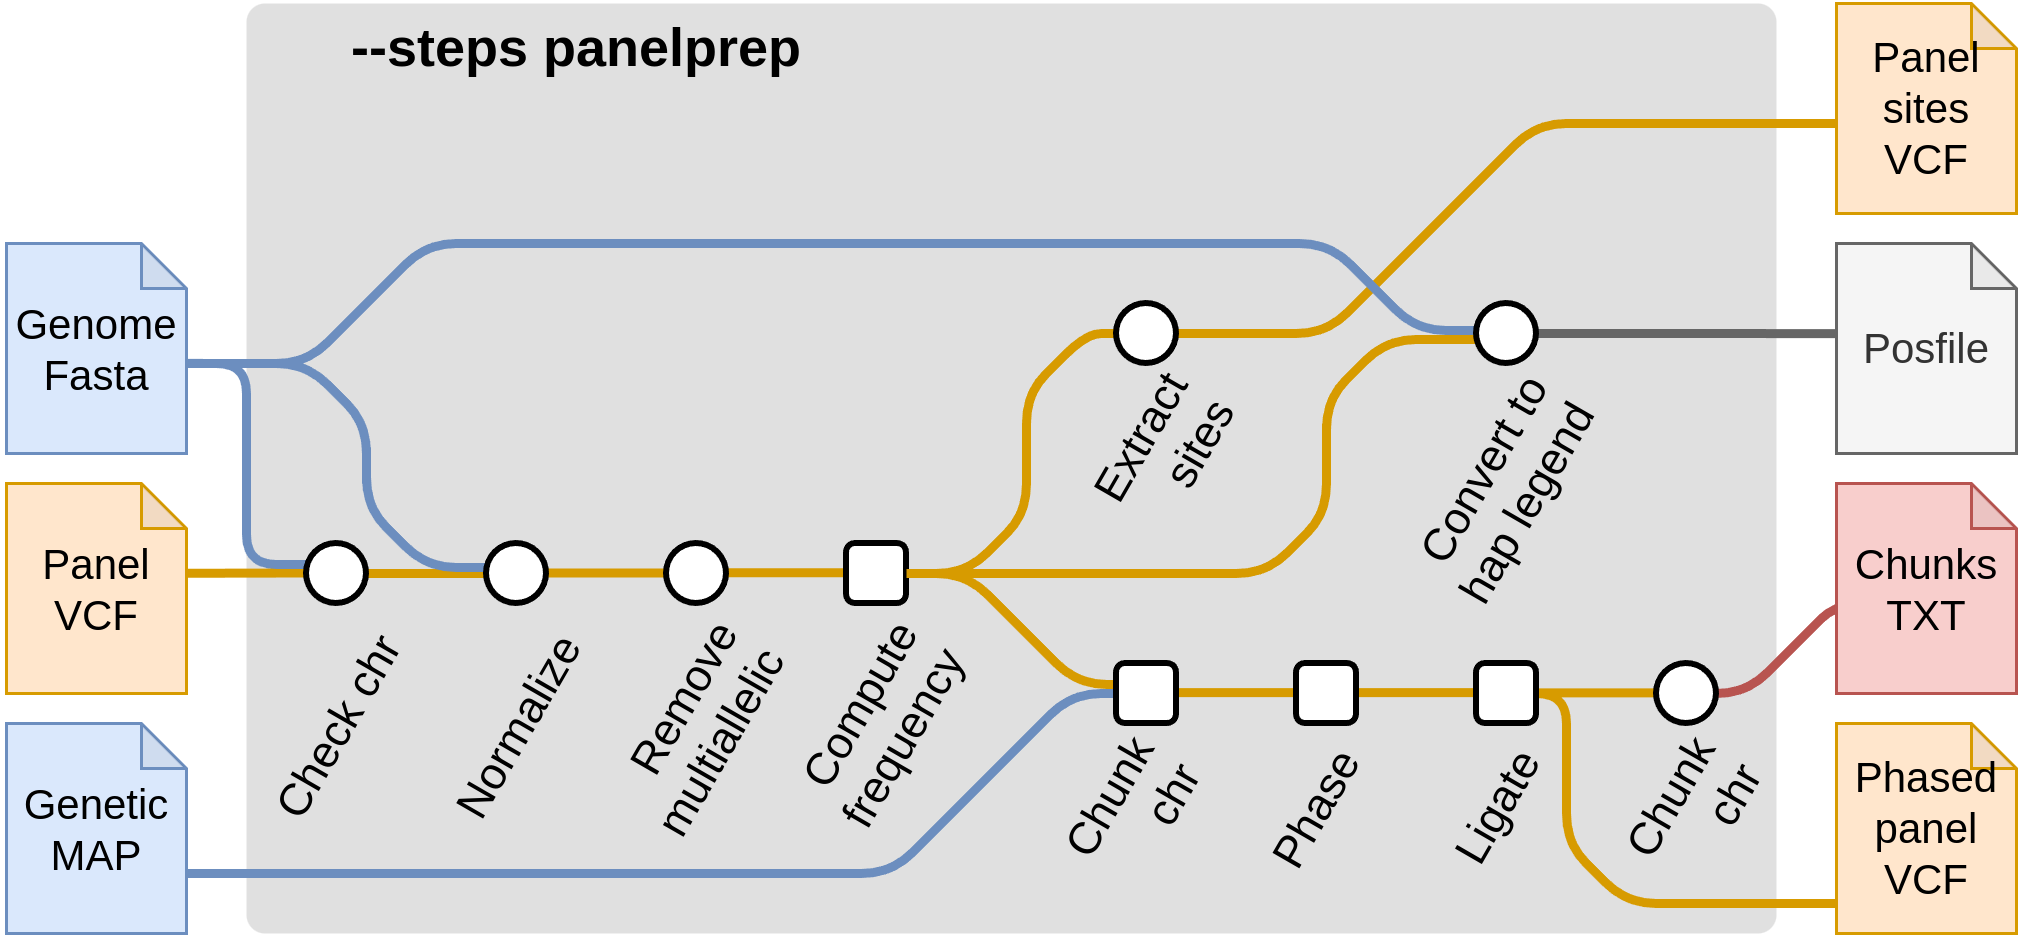
These steps pre-process the reference panel in order to be ready for imputation. There are a few quality control steps that are applied to reference panels. These include actions such as removing multiallelic SNPs and indels and removing certain samples from the reference panel (such as related samples). In addition, chunks are produced which are then used in the imputation steps. It is recommended that these steps are run once and the produced files are saved, to minimize the cost of reading the reference panel each time. Then, the output files from --steps panelprep can be used as input in the subsequent imputation steps, such as --steps impute.
For starting from panel preparation, the required flags are --steps panelprep and --panel samplesheet_reference.csv.
nextflow run nf-core/phaseimpute \ --input samplesheet.csv \ --panel samplesheet_reference.csv \ --steps panelprep --outdir results \ --genome GRCh37 -profile dockerThe required flags for this mode are:
--steps panelprep: The steps to run.--panel reference.csv: The samplesheet containing the reference panel files invcf.gzformat.--phase: (optional) Whether the reference panel should be phased (true|false).--normalize: (optional) Whether the reference panel needs to be normalized or not (true|false). The default value is true.--remove_samples: (optional) A comma-separated list of samples to remove from the reference during the normalization process.--compute_freq: (optional) Whether the frequency (AC/AN field) for each variants needs to be computed or not (true/false). This can be the case if the frequency is absent from the reference panel or if individuals have been removed.
The panel will be chunked using the GLIMPSE_CHUNKS process. The size of the chunks can be optimized according to your needs (e.g. cluster resources, specie chromosomes size, …) using the following config. The 4mb size (default value) is empirically determined to be a good value in humans (i.e. enough parallelization but not too much).
withName: 'NFCORE_PHASEIMPUTE:PHASEIMPUTE:VCF_CHUNK_GLIMPSE:GLIMPSE_CHUNK' {    ext.args   = "--window-size 4000000"}
withName: 'NFCORE_PHASEIMPUTE:PHASEIMPUTE:VCF_CHUNK_GLIMPSE:GLIMPSE2_CHUNK' {    ext.args   = "--window-mb 4"}
You can find an overview of the results produced by this steps in the Output.
Start with imputation --steps impute
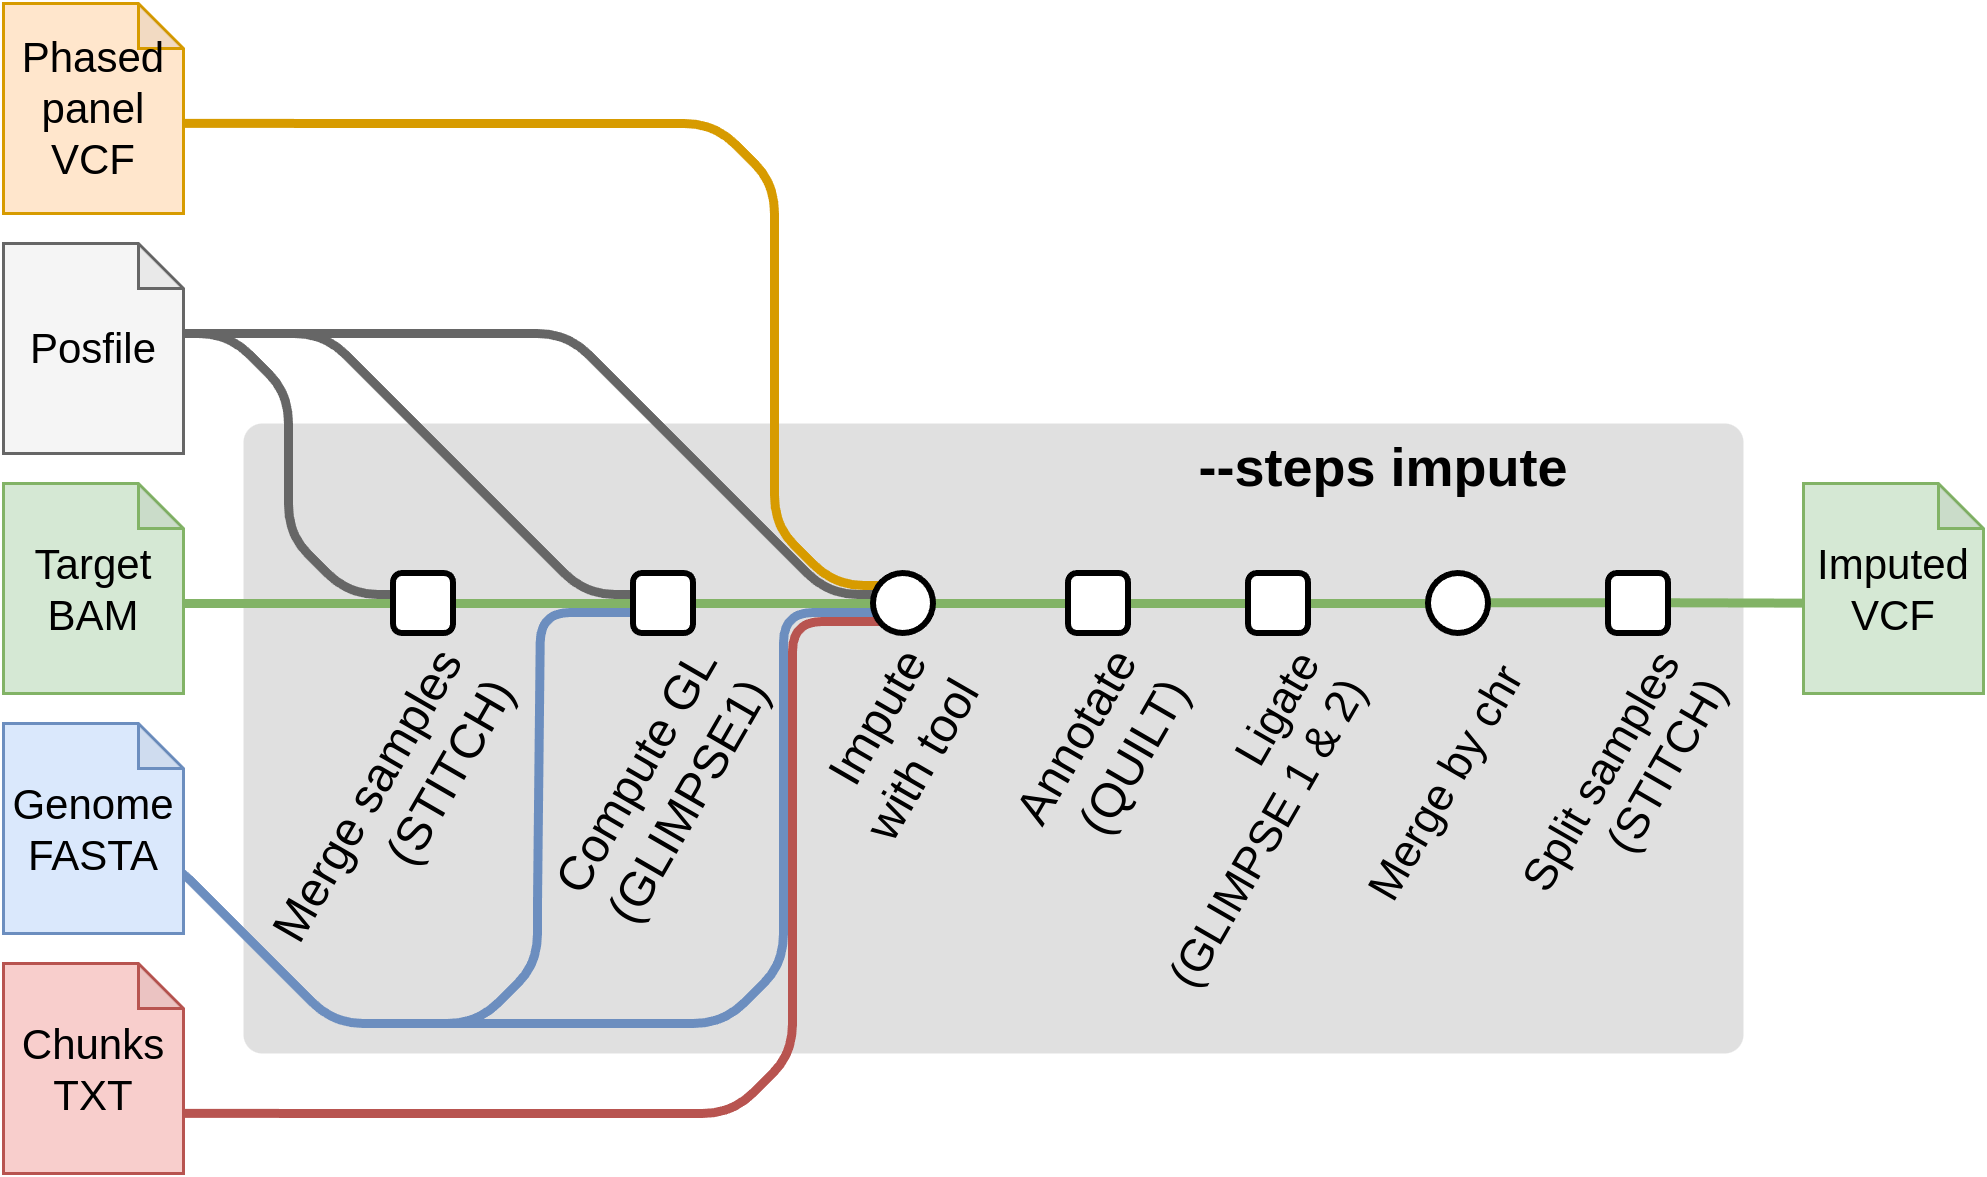
For starting from the imputation steps, the required flags are:
--steps impute--input input.csv: The samplesheet containing the input sample files inbam,cramorvcf,bcfformat.--genomeor--fasta: The reference genome of the samples.--tools [glimpse1,glimpse2,quilt,quilt2,stitch,beagle5,minimac4]: A selection of one or more of the available imputation tools. Each imputation tool has their own set of specific flags and input files. These required files are produced by--steps panelprepand used as input in:--posfile posfile.csv: A samplesheet containing all the different files required by the imputation tool. This file can be generated with--steps panelprep.--panel panel.csv: A samplesheet containing the post-processed reference panel VCF (required by GLIMPSE1, GLIMPSE2 and QUILT2). These files can be obtained with--steps panelprep.
Optionnaly you can provide the following flags:
--chunks chunks.csv: An optional samplesheet containing chunks per chromosome. These are produced by--steps panelprepusingGLIMPSE1orGLIMPSE2. See chunks section for more informations.--map map.csv: An optional samplesheet containing genetic map per chromosome. See map section for more informations.
Summary table of mandatory (m) and optional (o) parameters in --steps impute
--steps impute(m) |
--input(m) |
--genome or --fasta(m) |
--panel(m) |
--posfile(m/o) |
--map(o) |
--chunks(o) |
|
|---|---|---|---|---|---|---|---|
GLIMPSE1 |
✅ | ✅ ¹ | ✅ | ✅ | ✅ ³ | ✅ | ✅ |
GLIMPSE2 |
✅ | ✅ ¹ | ✅ | ✅ | ❌ | ✅ | ✅ |
QUILT |
✅ | ✅ ² | ✅ | ❌ | ✅ ⁴ | ✅ | ✅ |
QUILT2 |
✅ | ✅ ² | ✅ | ✅ ⁵ | ❌ | ✅ | ✅ |
STITCH |
✅ | ✅ ² | ✅ | ❌ | ✅ ³ | ✅ | ✅ |
BEAGLE5 |
✅ | ✅ ¹ | ✅ | ✅ | ❌ | ✅ | ✅ |
MINIMAC4 |
✅ | ✅ ¹ | ✅ | ✅ | ✅ ⁶ | ✅ | ✅ |
¹ Alignment files as well as variant calling format (i.e. BAM, CRAM, VCF or BCF) ² Alignment files only (i.e. BAM or CRAM) ³
GLIMPSE1andSTITCH: Should be a CSV with columns [panel id, chr, posfile] ⁴QUILT: Should be a CSV with columns [panel id, chr, hap, legend, posfile] ⁵QUILT2: Uses the reference panel VCF directly. The panel CSV should contain [panel id, chr, vcf, index] ⁶MINIMAC4: Optionally, a VCF with its index can be provided for more control over the imputed positions. Should be a CSV with columns [panel id, chr, vcf, index] ⁷ Not yet supported
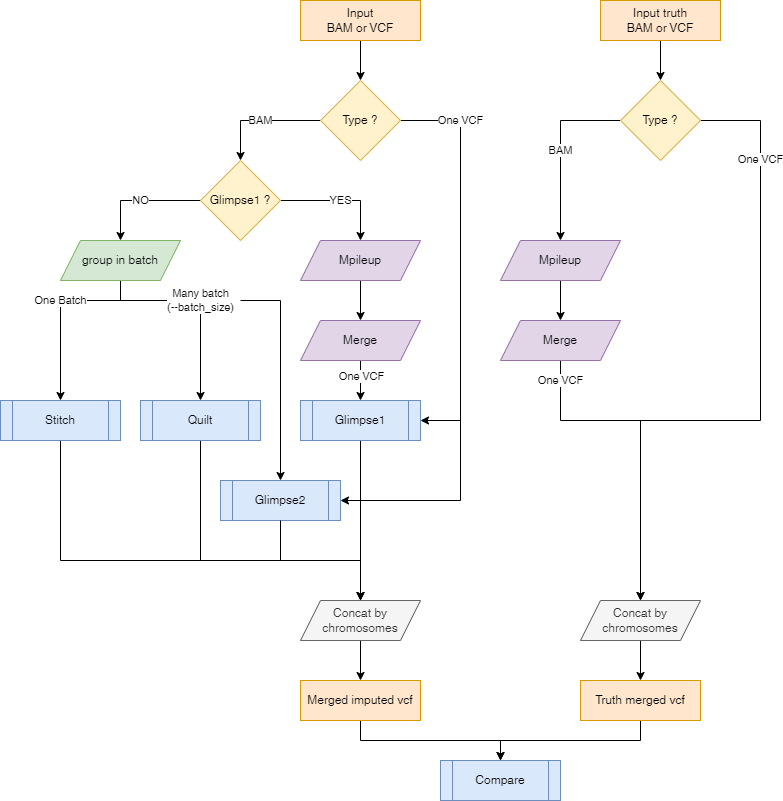
Here is a representation on how the input files will be processed depending on the input files type and the selected imputation tool.
Argument --batch_size
The --batch_size argument is used to specify the number of samples to be processed at once. This is useful when the number of samples is large and the memory is limited. The default value is 100 but it might need to be adapted to the size of each individuals data, the number of samples to be processed in parallel and the available memory.
Imputation software algorithms are time-consuming, with computational load dependent on the number of individuals, region size, and panel size. Some steps have fixed computational costs, meaning they take a similar amount of time whether imputing 2 or 200 individuals. By grouping individuals into larger batches, these fixed-cost steps are shared among more samples, reducing per-individual computational overhead and improving overall efficiency. However, memory usage must also be managed carefully when processing a large number of individuals within a single batch. Therefore, it is crucial to select a batch_size that is large enough to minimize fixed costs per individual but not so large that memory usage becomes unsustainable.
When the number of samples exceeds the batch size, the pipeline will split the samples into batches and process them sequentially. The files for each batch are stored in the ${outputdir}/imputation/batch folder.
STITCH and GLIMPSE1 do not support a batch size smaller than the total number of samples. This limit is set to prevent batch effects in the imputation process, as these tools rely on the genetic information from the entire target file to perform imputation. This approach, however, enhances the accuracy of phasing and imputation, as target individuals may provide a more informative genetic context (e.g., when related individuals are present in the target).
If you want to disable this option and run each sample separately you can set --batch_size 1
To summarize:
- If you have Variant Calling Format (VCF) files, join them into a single file and choose either GLIMPSE1, GLIMPSE2, BEAGLE5 or MINIMAC4.
- GLIMPSE1 and STITCH may induce batch effects, so all samples need to be imputed together.
- GLIMPSE2 should not do target-to-target imputation.
- If you have alignment files (e.g., BAM or CRAM), all tools are available, and processing will occur in
batch_size:- GLIMPSE1 and STITCH may induce batch effects, so all samples need to be imputed together.
- GLIMPSE2, QUILT and QUILT2 can process samples in separate batches.
Imputation tools --steps impute --tools [glimpse1,glimpse2,quilt,quilt2,stitch,beagle5,minimac4]
You can choose different software to perform the imputation. In the following sections, the typical commands for running the pipeline with each software are included. Multiple tools can be selected by separating them with a comma (eg. --tools glimpse1,quilt).
QUILT / QUILT2
QUILT is an R and C++ package for read-aware genotype imputation from low-coverage sequencing using a reference panel. This pipeline contains the original QUILT method (QUILT.R, referred to here as quilt) and the newer QUILT2 method (QUILT2.R, exposed in this pipeline as quilt2).
In nf-core/phaseimpute, both methods use alignment files from --input, optionally benefit from --map, and can use --chunks to split the genome into overlapping imputation regions.
Choose quilt2 by default for new projects. The official QUILT2 documentation describes it as the recommended modern method for large reference panels and diverse sequencing inputs including short reads, long reads, linked/barcoded reads and ancient DNA. The QUILT2 paper also reports a dedicated cfDNA/NIPT mode upstream; however, the current nf-core/phaseimpute integration includes the diploid imputation workflow only.
Choose quilt when you specifically want the original QUILT workflow.
quilt / quilt2
The required inputs for quilt are BAM/CRAM samples provided in the input samplesheet (--input) and a CSV file with the genomic chunks (--chunks).
nextflow run nf-core/phaseimpute \ --input samplesheet.csv \ --posfile posfile.csv \ --chunks chunks.csv \ --steps impute \ --tools quilt \ --outdir results \ --genome GRCh37 \ -profile dockerThe CSV file provided in --posfile has been described before and is produced by --steps panelprep. The .hap and .legend files in this CSV file are mandatory to use QUILT. The .posfile file is used to subset the variants to input --posfile parameter in QUILT.R.
panel,chr,hap,legend,posfile1000GP,chr22,1000GP.s.norel_chr22.hap.gz,1000GP.s.norel_chr22.legend.gz,1000GP.s.norel_chr22.posfileThe csv provided in --chunks has been described before in this document and is necessary to run this tool.
panel,chr,file1000GP,chr1,chunks_chr1.txt1000GP,chr2,chunks_chr2.txt1000GP,chr3,chunks_chr3.txtThe file column should contain a TXT/TSV file obtained from GLIMPSE1 with the following structure.
If you do not have a CSV file with chunks, you can provide a reference panel to run the --steps panelprep which produces a CSV file with these chunks, which is then used as input for QUILT. You can choose to run both steps sequentially as --steps panelprep,impute or simply collect the files produced by --steps panelprep.
nextflow run nf-core/phaseimpute \ --input samplesheet.csv \ --steps panelprep,impute \ --tools quilt \ --panel samplesheet_reference.csv \ --outdir results \ --genome GRCh37 \ -profile dockerGenetic map can also be provided for better accuracy. See Map section for more information.
STITCH
STITCH is an R program for low coverage sequencing genotype imputation without using a reference panel. The required inputs for this program are bam samples provided in the input samplesheet (--input) and a .posfile.gz file with the list of positions to genotype (--posfile). Internally, the pipeline converts the posfile with CHROM POS REF,ALT file to STITCH’s CHROM POS REF ALT format; users should always provide the comma-separated format described in the Posfile section.
If you do not have a position file, you can run the --steps panelprep with a reference panel that will produces the TSV file.
nextflow run nf-core/phaseimpute \ --input samplesheet.csv \ --steps panelprep \ --panel samplesheet_reference.csv \ --outdir results \ --genome GRCh37 \ -profile dockerOtherwise, you can provide your own position file in the --steps impute with STITCH using the the --posfile parameter.
nextflow run nf-core/phaseimpute \ --input samplesheet.csv \ --steps impute \ --posfile posfile.csv \ --tools stitch \ --outdir results \ --genome GRCh37 \ -profile dockerThe CSV file provided in --posfile must contain three columns [panel, chr, posfile]. See Posfile section for more information.
panel,chr,posfileNone,chr22,1000GP.s.norel_chr22.posfile.gzSTITCH only handles bi-allelic SNPs.
If you do not have a reference panel and you would like to obtain the posfile you can use the following command:
bcftools view -G -m 2 -M 2 -v ${vcf}bcftools convert --haplegendsample ${vcf} | bcftools query -f'%CHROM\t%POS\t%REF,%ALT\n' | bgzip -c > ${vcf}.posfile.gzYou can optionally provide chunks to parallelize the imputation process using --chunks.
If not provided the full region per chromosome will be used.
See Chunks section for more information.
Genetic map can also be provided for better accuracy. See Map section for more information.
GLIMPSE1
GLIMPSE1 is a set of tools for phasing and imputation for low-coverage sequencing datasets. Recommended for many samples at >0.5x coverage and small reference panels.
Glimpse1 works with variant (i.e. VCF or BCF) files as input.
Alignment (i.e. BAM or CRAM) can also be used and the variants will be called using bcftools mpileup to convert to a VCF format.
This is an example command to run this tool from the --steps impute:
nextflow run nf-core/phaseimpute \ --input samplesheet.csv \ --panel samplesheet_reference.csv \ --steps impute \ --tools glimpse1 \ --outdir results \ --genome GRCh37 \ -profile docker \ --posfile posfile.csv --chunks chunks.csvThe CSV file provided in --posfile must contain three columns [panel, chr, posfile]. See Posfile section for more information.
panel,chr,posfile1000GP,chr22,1000GP.s.norel_chr22.posfile.gzThe CSV file provided in --panel must be prepared with --steps panelprep and must contain four columns [panel, chr, vcf, index].
You can optionally provide chunks to parallelize the imputation process using --chunks.
If not provided the full region per chromosome will be used.
See Chunks section for more information.
Genetic map can also be provided for better accuracy. See Map section for more information.
GLIMPSE2
GLIMPSE2 is a set of tools for phasing and imputation for low-coverage sequencing datasets. This is an example command to run this tool from the --steps impute:
nextflow run nf-core/phaseimpute \ --input samplesheet.csv \ --panel samplesheet_reference.csv \ --steps impute \ --tools glimpse2 \ --outdir results \ --chunks chunks.csv \ --genome GRCh37 \ -profile dockerMake sure the CSV file with the input panel is the output from --step panelprep or has been previously prepared.
You can optionally provide chunks to parallelize the imputation process using --chunks.
If not provided the full region per chromosome will be used.
See Chunks section for more information.
Genetic map can also be provided for better accuracy. See Map section for more information.
BEAGLE5
BEAGLE5 is a software package for analyzing large-scale genetic data sets with hundreds of thousands of markers genotyped on thousands of samples. BEAGLE can phase genotype data and perform genotype imputation but only on genotyped data.
nextflow run nf-core/phaseimpute \ --input samplesheet.csv \ --panel samplesheet_reference.csv \ --steps impute \ --tools beagle5 \ --outdir results \ --genome GRCh37 \ -profile dockerThe CSV file provided in --panel must be prepared with --steps panelprep and must contain four columns [panel, chr, vcf, index].
You can optionally provide chunks to parallelize the imputation process using --chunks.
If not provided the full region per chromosome will be used.
See Chunks section for more information.
Genetic map can also be provided for better accuracy. See Map section for more information.
MINIMAC4
MINIMAC4 is a low memory, computationally efficient implementation of the MaCH algorithm for genotype imputation. It is designed to work on phased haplotypes and can handle very large reference panels.
nextflow run nf-core/phaseimpute \ --input samplesheet.csv \ --panel samplesheet_reference.csv \ --steps impute \ --tools minimac4 \ --outdir results \ --genome GRCh37 \ -profile docker \ --posfile posfile.csvThe CSV file can be provided in --posfile with four columns [panel, chr, vcf, index]. This file is used to select which position to impute. See Posfile section for more information.
panel,chr,vcf,index1000GP,chr22,1000GP.s.norel_chr22.sites.vcf.gz,1000GP.s.norel_chr22.sites.vcf.gz.csiThe CSV file provided in --panel must be prepared with --steps panelprep and must contain four columns [panel, chr, vcf, index].
MINIMAC4 works only with variant calling format files (VCF or BCF) as input.
You can optionally provide chunks to parallelize the imputation process using --chunks.
If not provided the full region per chromosome will be used.
See Chunks section for more information.
Genetic map can also be provided for better accuracy. See Map section for more information.
Start with validation --steps validate

This step compares a truth VCF to an imputed VCF in order to compute imputation accuracy.
This also needs the frequency of the alleles. They can be computed from the reference panel by running the --steps panelprep and using the --panel with the --compute_freq flag ; or by using --posfile samplesheet.csv.
nextflow run nf-core/phaseimpute \ --input samplesheet.csv \ --input_truth truth.csv \ --posfile posfile.csv \ --steps validate \ --outdir results \ --genome GRCh37 \ -profile dockerThe required flags for this mode only are:
--steps validate: The steps to run.--input input.csv: The samplesheet containing the input sample files invcforbcfformat.--input_truth input_truth.csv: The samplesheet containing the truth VCF files invcfformat. This can also acceptbamorcramfiles as input but will need the additionallegendfile in the--posfileto call the variants. The structure of theinput_truth.csvis the same as theinput.csvfile. See Samplesheet input for more information.--posfile posfile.csv: A samplesheet containing the panel sites informations invcfformat for each chromosome.
The CSV file provided in --posfile must contain four columns [panel, chr, vcf, index]. See Posfile section for more information.
panel,chr,vcf,index1000GP,chr22,1000GP.s.norel_chr22.sites.vcf.gz,1000GP.s.norel_chr22.sites.csiRun all steps sequentially --steps all
This mode runs all the previous steps. This requires several flags:
--steps all: The steps to run.--input input.csv: The samplesheet containing the input sample files inbamorcramformat.--depth: The final depth of the input file [default: 1].--genomeor--fasta: The reference genome of the samples.--tools [glimpse1,glimpse2,quilt,stitch,beagle5]: A selection of one or more of the available imputation tools.--panel panel.csv: The samplesheet containing the reference panel files invcf.gzformat.--remove_samples: (optional) A comma-separated list of samples to remove from the reference.--input_truth input_truth.csv: The samplesheet containing the truth VCF files invcfformat. This can also acceptbamorcramfiles as input but will need the additionallegendfile in the--posfileto call the variants. The structure of theinput_truth.csvis the same as theinput.csvfile. See Samplesheet input for more information.
Contig Name Validation and QC
The first step of the pipeline is to validate the consistency of contig names across all input files. Since the pipeline parallelizes the imputation process by contig, it needs to ensure that the contigs are consistently defined across several files. This step uses either the --regions samplesheet or the .fai file to identify the genomic regions to process.
However, some contigs specified in these files may be absent from other key files, such as the --panel, --posfile, --chunks, --map (column chr), or --fasta. When this happens, the pipeline generates a warning to notify you of the missing contigs. It then narrows down the process to only the contigs that are common across all required files.
Finally, the pipeline performs a detailed check with the CHECKCHR tool to verify that these contigs are present in every --input and --input_truth file, as well as in the individual reference panel files. This prevents inconsistencies in downstream steps.
Updating the pipeline
When you run the above command, Nextflow automatically pulls the pipeline code from GitHub and stores it as a cached version. When running the pipeline after this, it will always use the cached version if available - even if the pipeline has been updated since. To make sure that you’re running the latest version of the pipeline, make sure that you regularly update the cached version of the pipeline:
nextflow pull nf-core/phaseimputeReproducibility
It is a good idea to specify the pipeline version when running the pipeline on your data. This ensures that a specific version of the pipeline code and software are used when you run your pipeline. If you keep using the same tag, you’ll be running the same version of the pipeline, even if there have been changes to the code since.
First, go to the nf-core/phaseimpute releases page and find the latest pipeline version - numeric only (eg. 1.3.1). Then specify this when running the pipeline with -r (one hyphen) - eg. -r 1.3.1. Of course, you can switch to another version by changing the number after the -r flag.
This version number will be logged in reports when you run the pipeline, so that you’ll know what you used when you look back in the future. For example, at the bottom of the MultiQC reports.
To further assist in reproducibility, you can use share and reuse parameter files to repeat pipeline runs with the same settings without having to write out a command with every single parameter.
If you wish to share such profile (such as upload as supplementary material for academic publications), make sure to NOT include cluster specific paths to files, nor institutional specific profiles.
Core Nextflow arguments
These options are part of Nextflow and use a single hyphen (pipeline parameters use a double-hyphen)
-profile
Use this parameter to choose a configuration profile. Profiles can give configuration presets for different compute environments.
Several generic profiles are bundled with the pipeline which instruct the pipeline to use software packaged using different methods (Docker, Singularity, Podman, Shifter, Charliecloud, Apptainer, Conda) - see below.
We highly recommend the use of Docker or Singularity containers for full pipeline reproducibility, however when this is not possible, Conda is also supported.
The pipeline also dynamically loads configurations from https://github.com/nf-core/configs when it runs, making multiple config profiles for various institutional clusters available at run time. For more information and to check if your system is supported, please see the nf-core/configs documentation.
Note that multiple profiles can be loaded, for example: -profile test,docker - the order of arguments is important!
They are loaded in sequence, so later profiles can overwrite earlier profiles.
If -profile is not specified, the pipeline will run locally and expect all software to be installed and available on the PATH. This is not recommended, since it can lead to different results on different machines dependent on the computer environment.
test- A profile with a complete configuration for automated testing
- Includes links to test data so needs no other parameters
docker- A generic configuration profile to be used with Docker
singularity- A generic configuration profile to be used with Singularity
podman- A generic configuration profile to be used with Podman
shifter- A generic configuration profile to be used with Shifter
charliecloud- A generic configuration profile to be used with Charliecloud
apptainer- A generic configuration profile to be used with Apptainer
wave- A generic configuration profile to enable Wave containers. Use together with one of the above (requires Nextflow
24.03.0-edgeor later).
- A generic configuration profile to enable Wave containers. Use together with one of the above (requires Nextflow
conda- A generic configuration profile to be used with Conda. Please only use Conda as a last resort i.e. when it’s not possible to run the pipeline with Docker, Singularity, Podman, Shifter, Charliecloud, or Apptainer.
-resume
Specify this when restarting a pipeline. Nextflow will use cached results from any pipeline steps where the inputs are the same, continuing from where it got to previously. For input to be considered the same, not only the names must be identical but the files’ contents as well. For more info about this parameter, see this blog post.
You can also supply a run name to resume a specific run: -resume [run-name]. Use the nextflow log command to show previous run names.
-c
Specify the path to a specific config file (this is a core Nextflow command). See the nf-core website documentation for more information.
Custom configuration
Resource requests
Whilst the default requirements set within the pipeline will hopefully work for most people and with most input data, you may find that you want to customise the compute resources that the pipeline requests. Each step in the pipeline has a default set of requirements for number of CPUs, memory and time. For most of the pipeline steps, if the job exits with any of the error codes specified here it will automatically be resubmitted with higher resources request (2 x original, then 3 x original). If it still fails after the third attempt then the pipeline execution is stopped.
To change the resource requests, please see the max resources and customise process resources section of the nf-core website.
Custom Containers
In some cases, you may wish to change the container or conda environment used by a pipeline steps for a particular tool. By default, nf-core pipelines use containers and software from the biocontainers or bioconda projects. However, in some cases the pipeline specified version maybe out of date.
To use a different container from the default container or conda environment specified in a pipeline, please see the updating tool versions section of the nf-core website.
Custom Tool Arguments
A pipeline might not always support every possible argument or option of a particular tool used in pipeline. Fortunately, nf-core pipelines provide some freedom to users to insert additional parameters that the pipeline does not include by default. The different configuration for the different processes are organized as follow:
├── conf│ ├── steps│ │ ├── chrcheck.config # Configuration for the chrcheck workflow│ │ ├── imputation_glimpse1.config # Configuration for the impute step with GLIMPSE1│ │ ├── imputation_glimpse2.config # Configuration for the impute step with GLIMPSE2│ │ ├── imputation_quilt.config # Configuration for the impute step with QUILT│ │ ├── imputation_stitch.config # Configuration for the impute step with STITCH│ │ ├── initialisation.config # Configuration for the initialisation subworkflow│ │ ├── panelprep.config # Configuration for the panelprep step│ │ ├── simulation.config # Configuration for the simulation step│ │ └── validation.config # Configuration for the validation step│ ├── base.config # Base configuration for the pipeline│ └── modules.config # Configuration for the statistical and multiqc modulesOne of the parameters that you might want to modify could be specific to each imputation software. As an example, running the pipeline, you may encounter that to reduce the impact of individual reads (for example in QUILT), you might need to lower coverage. This can be achieved by including any modification to a Nextflow process as an external argument using ext.args. You would customize the run by providing:
process { withName:'NFCORE_PHASEIMPUTE:PHASEIMPUTE:BAM_IMPUTE_QUILT:QUILT_QUILT' { ext.args = "--downsampleToCov=1" }}To learn how to provide additional arguments to a particular tool of the pipeline, please see the customising tool arguments section of the nf-core website.
nf-core/configs
In most cases, you will only need to create a custom config as a one-off but if you and others within your organisation are likely to be running nf-core pipelines regularly and need to use the same settings regularly it may be a good idea to request that your custom config file is uploaded to the nf-core/configs git repository. Before you do this please can you test that the config file works with your pipeline of choice using the -c parameter. You can then create a pull request to the nf-core/configs repository with the addition of your config file, associated documentation file (see examples in nf-core/configs/docs), and amending nfcore_custom.config to include your custom profile.
See the main Nextflow documentation for more information about creating your own configuration files.
If you have any questions or issues please send us a message on Slack on the #configs channel.
Running in the background
Nextflow handles job submissions and supervises the running jobs. The Nextflow process must run until the pipeline is finished.
The Nextflow -bg flag launches Nextflow in the background, detached from your terminal so that the workflow does not stop if you log out of your session. The logs are saved to a file.
Alternatively, you can use screen / tmux or similar tool to create a detached session which you can log back into at a later time.
Some HPC setups also allow you to run nextflow within a cluster job submitted your job scheduler (from where it submits more jobs).
Nextflow memory requirements
In some cases, the Nextflow Java virtual machines can start to request a large amount of memory.
We recommend adding the following line to your environment to limit this (typically in ~/.bashrc or ~./bash_profile):
NXF_OPTS='-Xms1g -Xmx4g'Specify the path to a specific config file (this is a core Nextflow command). See the nf-core website documentation for more information.