nf-core/viralmetagenome
A nf-core pipeline for untargeted whole genome reconstruction with iSNV detection from metagenomic samples.
Introduction
nf-core/viralmetagenome is a bioinformatics best-practice analysis pipeline for reconstructing consensus genomes and to identify intra-host variants from metagenomic sequencing data or enriched based sequencing data like hybrid capture.
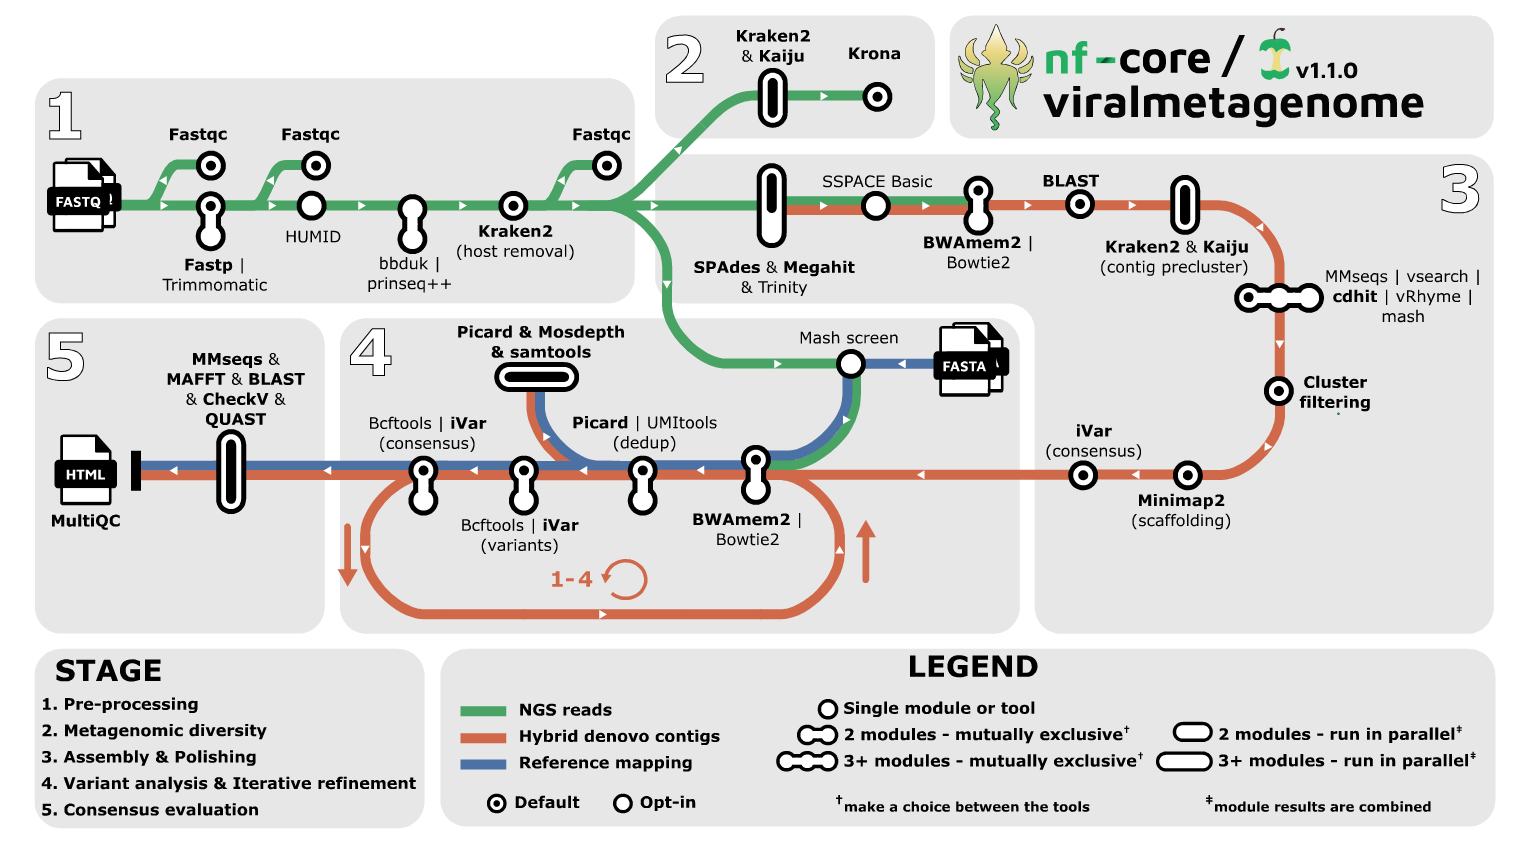
|indicates the need to choose a tool&indicate that output of tools can be combined and run in parallel.
- Read QC (
FastQC) - Performs optional read pre-processing
- Metagenomic diversity mapping (
Kraken2,BrackenKaiju) - Denovo assembly (
SPAdes,TRINITY,megahit), combine contigs. - [Optional] Extend the contigs with sspace_basic and filter with
prinseq++ - [Optional] Map reads to contigs for coverage estimation (
Bowtie2,BWA-MEM2) - Contig reference identification (
blastn), the top 5 hits for every contig are considered for scaffolding - [Optional] Precluster contigs on taxonomy classification with
Kraken2and/orKaiju - Cluster contigs (or every taxonomic bin) with any of the following tools:
CD-HIT-EST,vsearch,mmseqs-linclust,mmseqs-cluster,vRhymeorMashwithClusty - [Optional] Remove clusters with low read coverage.
bin/extract_clusters.py - Scaffolding of contigs to centroid (
Minimap2,iVar-consensus) - [Optional] Select best reference from
--mapping_constraints: (Mash sketch,Mash screen) - Mapping filtered reads to supercontig and mapping constraints (
Bowtie2,BWA-MEM2) - [Optional] Deduplicate reads (
Picardor if UMI’s are usedUMI-tools) - [Optional] Determine various mapping statistics (
Picard,mosdepth, andsamtools) - Variant calling and filtering (
BCFtools,iVar) - Create consensus genome (
BCFtools,iVar) - Iterative refinement, repeat step 13-17 multiple times for the denovo contig route
- [Optional] Variant annotation (
SnpEff,SnpSift) - [Optional] Consensus evaluation and annotation with multiple tools(
QUAST,CheckV,blastn,prokka,mmseqs-search,MAFFT- alignment of contigs vs iterations & consensus). - Result summary visualisation for raw read, alignment, assembly, variant calling and consensus calling results (
MultiQC)
Usage
If you are new to Nextflow and nf-core, please refer to this page on how to set-up Nextflow. Make sure to test your setup with -profile test before running the workflow on actual data.
First, prepare a samplesheet with your input data that looks as follows:
samplesheet.csv:
sample,fastq_1,fastq_2
sample1,AEG588A1_S1_L002_R1_001.fastq.gz,AEG588A1_S1_L002_R2_001.fastq.gz
sample2,AEG588A5_S5_L003_R1_001.fastq.gz,
sample3,AEG588A3_S3_L002_R1_001.fastq.gz,AEG588A3_S3_L002_R2_001.fastq.gz
Each row represents a fastq file (single-end) or a pair of fastq files (paired end).
Now, you can run the pipeline using:
nextflow run nf-core/viralmetagenome \
   -profile <docker/singularity/.../institute> \
   --input samplesheet.csv \
--outdir <OUTDIR>Please provide pipeline parameters via the CLI or Nextflow -params-file option. Custom config files including those provided by the -c Nextflow option can be used to provide any configuration except for parameters; see docs.
To see the results of an example test run with a full size dataset refer to the results tab on the nf-core website pipeline page. For more details about the output files and reports, please refer to the output documentation.
Credits
nf-core/viralmetagenome was originally written by Joon Klaps, Philippe Lemey, Liana Kafetzopoulou.
We thank the following people for their extensive assistance in the development of this pipeline:
Contributions and Support
If you would like to contribute to this pipeline, please see the contributing guidelines.
For further information or help, don’t hesitate to get in touch on the Slack #viralmetagenome channel (you can join with this invite).
Citations
Klaps J, Lemey P, nf-core community, Kafetzopoulou LE. nf-core/viralmetagenome: A Novel Pipeline for Untargeted Viral Genome Reconstruction bioRxiv 2025.06.27.661954; doi:10.1101/2025.06.27.661954
An extensive list of references for the tools used by the pipeline can be found in the CITATIONS.md file.
The nf-core framework for community-curated bioinformatics pipelines.
Philip Ewels, Alexander Peltzer, Sven Fillinger, Harshil Patel, Johannes Alneberg, Andreas Wilm, Maxime Ulysse Garcia, Paolo Di Tommaso & Sven Nahnsen.
Nat Biotechnol. 2020 Feb 13. doi: 10.1038/s41587-020-0439-x.