novel allele detection and genotype inference tutorial
This tutorial provides an introduction on how to perform novel allele detection and genotype inference with nf-core/airrflow. The workflow currently supports novel allele inference and genotype inference for BCR sequences only, which are performed using TIgGER. We plan to add TCR genotyping and novel allele detection in future releases.
Pre-requisites
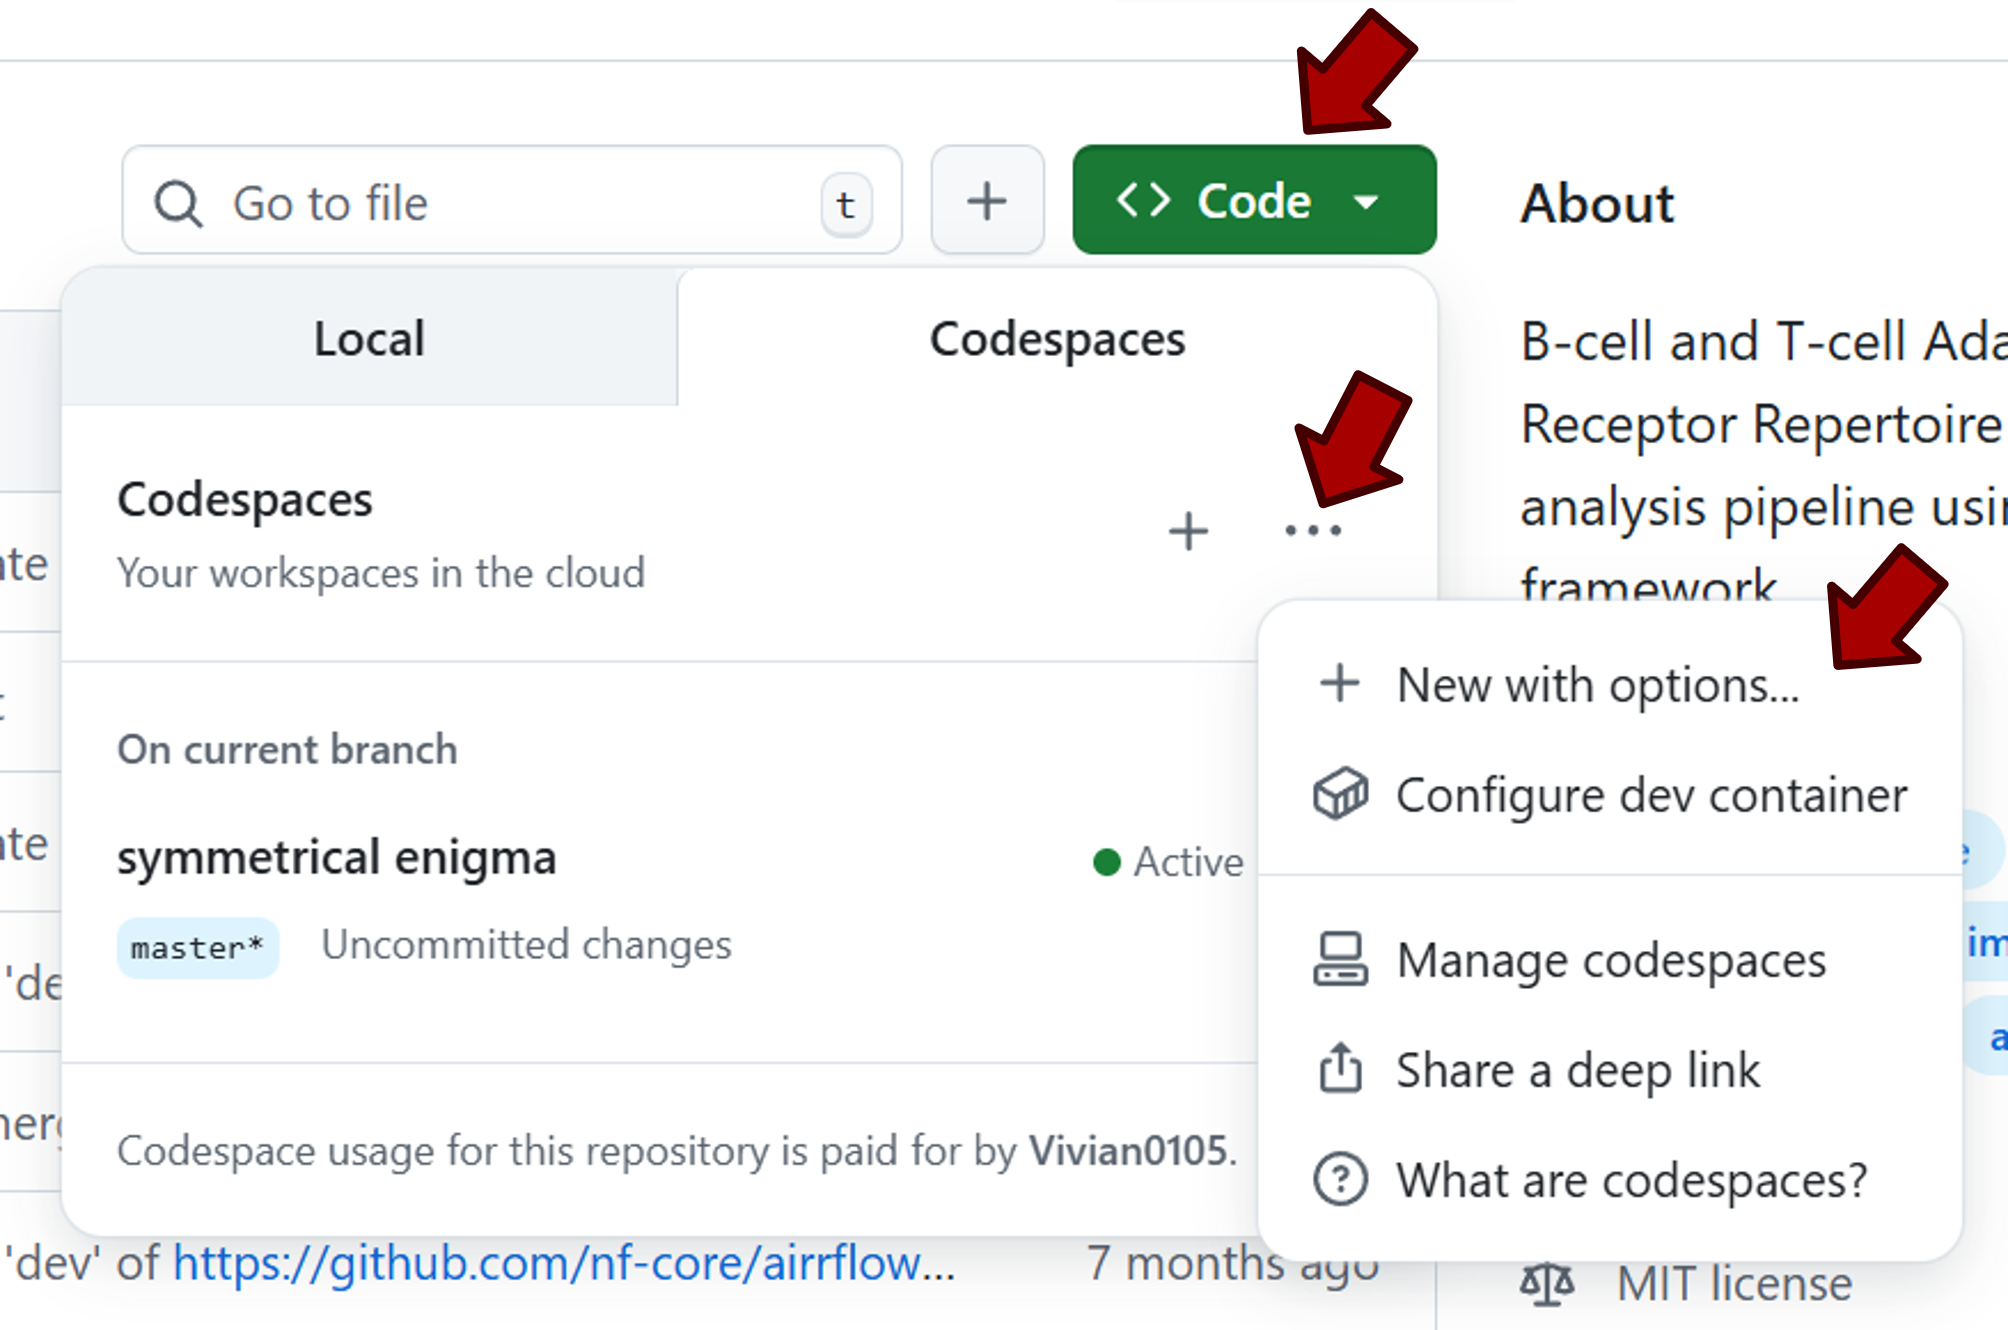
You can run this tutorial using the Github Codespaces platform. Codespaces already has Nextflow and Singularity pre-installed, and it can automatically be used for every nf-core repository. To create a Codespace instance for nf-core/airrflow, first click on the button labelled Code at the top of nf-core/airrflow repository.
In the dropdown menu, go to the Codespaces tab. Click the ... sign, then select + New with options....
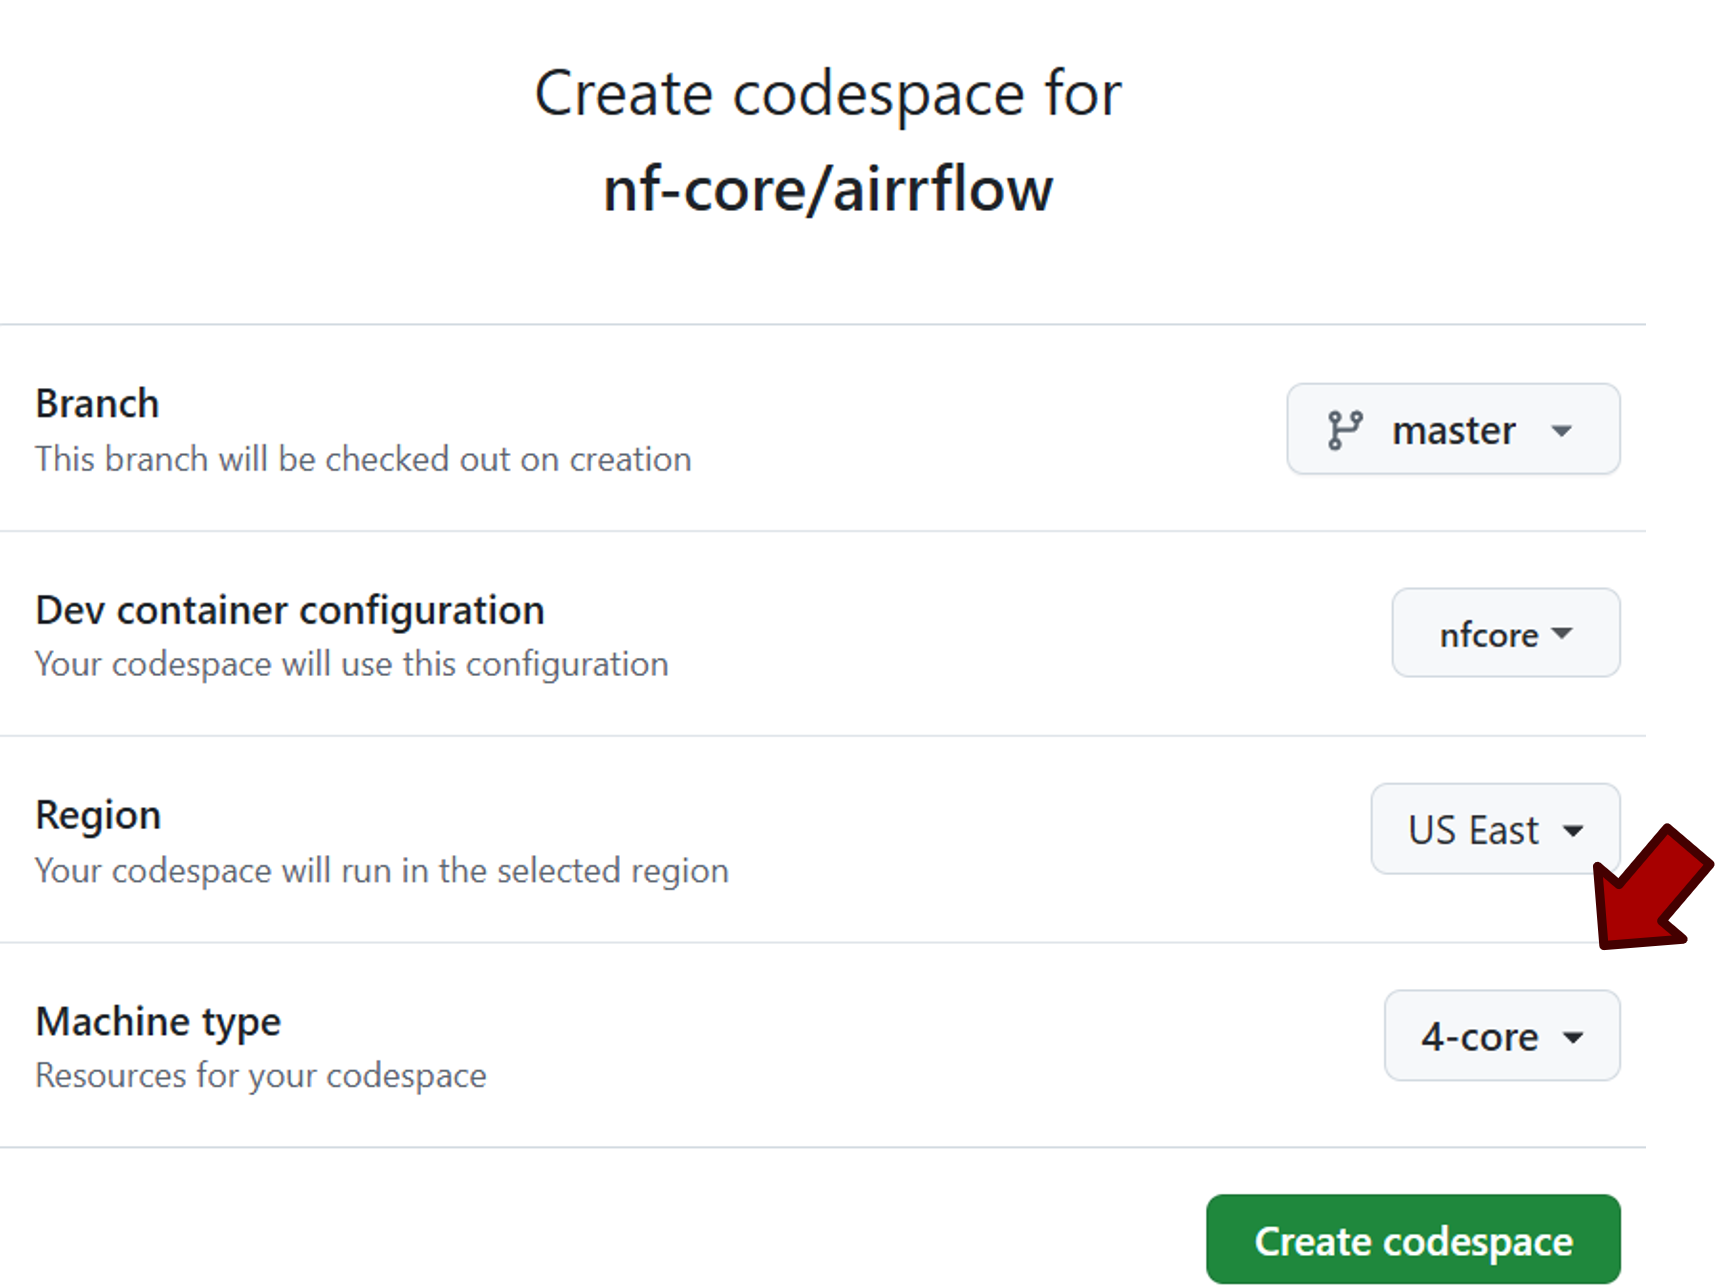
After that, you’ll be directed to the configuration page. Select “4-core” for machine type, which will give you 4 CPUs, 16GB RAM and 32GB space.
If you want to know more about Codespaces, check the Codespaces overview or the Codespaces section in nf-core documentation the Dev Containers overview.
When running this tutorial on your local machine, you’ll first have to set up Nextflow and a container engine (Docker or Singularity).
If you want to run this tutorial on your local machine, please refer to this page on how to set up Nextflow and a container engine needed to run this pipeline. At the moment, nf-core/airrflow does NOT support using conda virtual environments for dependency management, only containers are supported. Make sure to test your setup before running the workflow on actual data. To install Docker, follow the instructions. After installation Docker on Linux, don’t forget to check the post-installation steps.
Why are novel allele detection and genotyping important?
Many steps for analyzing BCR sequences rely on inferring the germline V, D and J genes and alleles for each sequence by matching against a germline reference, such as clonal analysis or somatic hypermutation (SHM) quantification. However, analyzed individuals can have alleles not present in the germline reference (novel alleles), which if undetected can inflate the SHM rates. Ambiguous V(D)J assignment is another common issue caused by V(D)J gene similarity, SHM of sequence and sequence quality. To solve these issues, we added to nf-core/airrflow novel allele detection and genotyping which is to infer the genotypes an individual carry. These two steps can effectively correct and V(D)j assignment and reduce the ambiguous call.
How to perform novel allele detection and genotyping using nf-core/airrflow
nf-core/airrflow has functionality to infer IG loci novel alleles and perform genotyping. To perform these two additional functions in the workflow, simply add flag --genotyping in your command.
With the flag --genotyping on, the following steps will be executed before clonal inference by default:
- Infer the presence of novel IGHV alleles not in the germline database. You are able to turn this step off by adding the flag
--novel_allele_inference falsein the command. - Assign novel alleles to samples. Of course if
--novel_allele_inference falseis set, this step is also skipped. - Infer clones and use one single representative sequence per clone for genotype inference. This is a strongly recommended step to reduce the impact of clonal expansion on genotyping. However, if you want to reduce running time, you can turn if off by setting
--single_clone_representative falsein the command. - Infer the personalized genotype of each subject.
- Correct the allele calls of sequences based on the subject genotype.
By default, genotyping is performed by the annotations in the subject_id column in the provided samplesheet. This can be altered with the parameter --genotypeby, and it is possible to provide an alternative column in the samplesheet to indicated which samples should be pulled together for genotyping.
After these steps, the allele calls have been corrected for each subject for clonal inference and the remaining downstream analysis steps.
Running the nf-core/airrflow with genotyping
In this tutorial, we will showcase how to perform novel allele detection and genotype inference by executing the pipeline on one human bulk BCR sample.
Preparing the samplesheet and configuration file
To run the pipeline, a tab-separated samplesheet that provides the path to the AIRR rearrangement files must be prepared. The samplesheet collects experimental details that are important for the data analysis.
Details on the required columns of a samplesheet are available here.
The resource configuration file sets the compute infrastructure maximum available number of CPUs, RAM memory and running time. This will ensure that no pipeline process requests more resources than available in the compute infrastructure where the pipeline is running. The resource config should be provided with the -c option. In this example we set the maximum RAM memory to 15GB, we restrict the pipeline to use 4 CPUs and to run for a maximum of 24 hours.
process { resourceLimits = [ memory: 15.GB, time: 24.h, cpus: 4 ]}We prepared the samplesheet and the configuration file for this tutorial. If you want to run the pipeline locally, download both files to the directory where you intend to run nf-core/airrflow. If you are in Codespace, simply go to the directory (/docs/usage/genotyping_tutorial/sample_data_code) where the files stored and run the pipelines within that directory.
Before setting memory and CPUs in the configuration file, we recommend verifying the available memory and CPUs on your system. Otherwise, exceeding the system’s capacity may result in an error indicating that you requested more CPUs than available or run out of memory. You can also remove the “time” parameter from the configuration file to allow for unlimited runtime for large-size dataset.
When running nf-core/airrflow with your own data, provide the full path to your input files under the filename column.
Running airrflow
If you are running the pipeline on Codespace, within the directory where the prepared samplesheet and configuration file are located, you can run the following command:
nextflow run nf-core/airrflow -r 5.1.0 \-profile singularity \--mode assembled \--genotyping \--single_clone_representative false \ #skipped for time reasons--skip_clonal_analysis \ #skipped for time reasons--input genotype_samplesheet.tsv \--outdir test_genotype_results \-c resource.config \-resumeOf course you can wrap all your code in a bash file. With the bash file, it’s easy to run the pipeline with a single-line command.
bash airrflow_genotyping_codespace.shThe estimated running time is 15 minutes. We also uploaded the tutorial results on Zenodo.
We skipped single clone representative and clonal analysis here to save time because it’s slow to run all the steps within Codespace due to the limited resources, but we recommend not skipping these steps in real life analyses.
If you run the pipeline locally. Download the samplesheet and start the pipeline using the following command.
nextflow run nf-core/airrflow -r 5.1.0 \-profile docker \--mode assembled \--genotyping \--input genotype_samplesheet.tsv \--outdir test_genotype_results \-resumeOr to run the pipeline with the following single-line command.
bash airrflow_genotyping.shWhen launching a Nextflow pipeline with the -resume option, any processes that have already been run with the exact same code, settings and inputs will be cached and the pipeline will resume from the last step that changed or failed with an error. The benefit of using “resume” is to avoid duplicating previous work and save time when re-running a pipeline.
We include “resume” in our Nextflow command as a precaution in case anything goes wrong during execution. After fixing the issue, you can relaunch the pipeline with the same command, it will resume running from the point of failure, significantly reducing runtime and resource usage.
Understanding the results
After running the pipeline, several sub-folders are available under the results folder.
Airrflow_report.html- cellranger- vdj_annotation- qc_filtering- novel_alleles_and_genotyping- clonal_analysis- repertoire_comparison- multiqc- report_file_size- pipeline_infoThe results of novel allele detection and genotype inference are stored in the novel_alleles_and_genotyping subfolder. Within this directory, 01-novel_allele_inference contains the novel allele detection results, and 02-genotype_inference contains the genotype inference results.
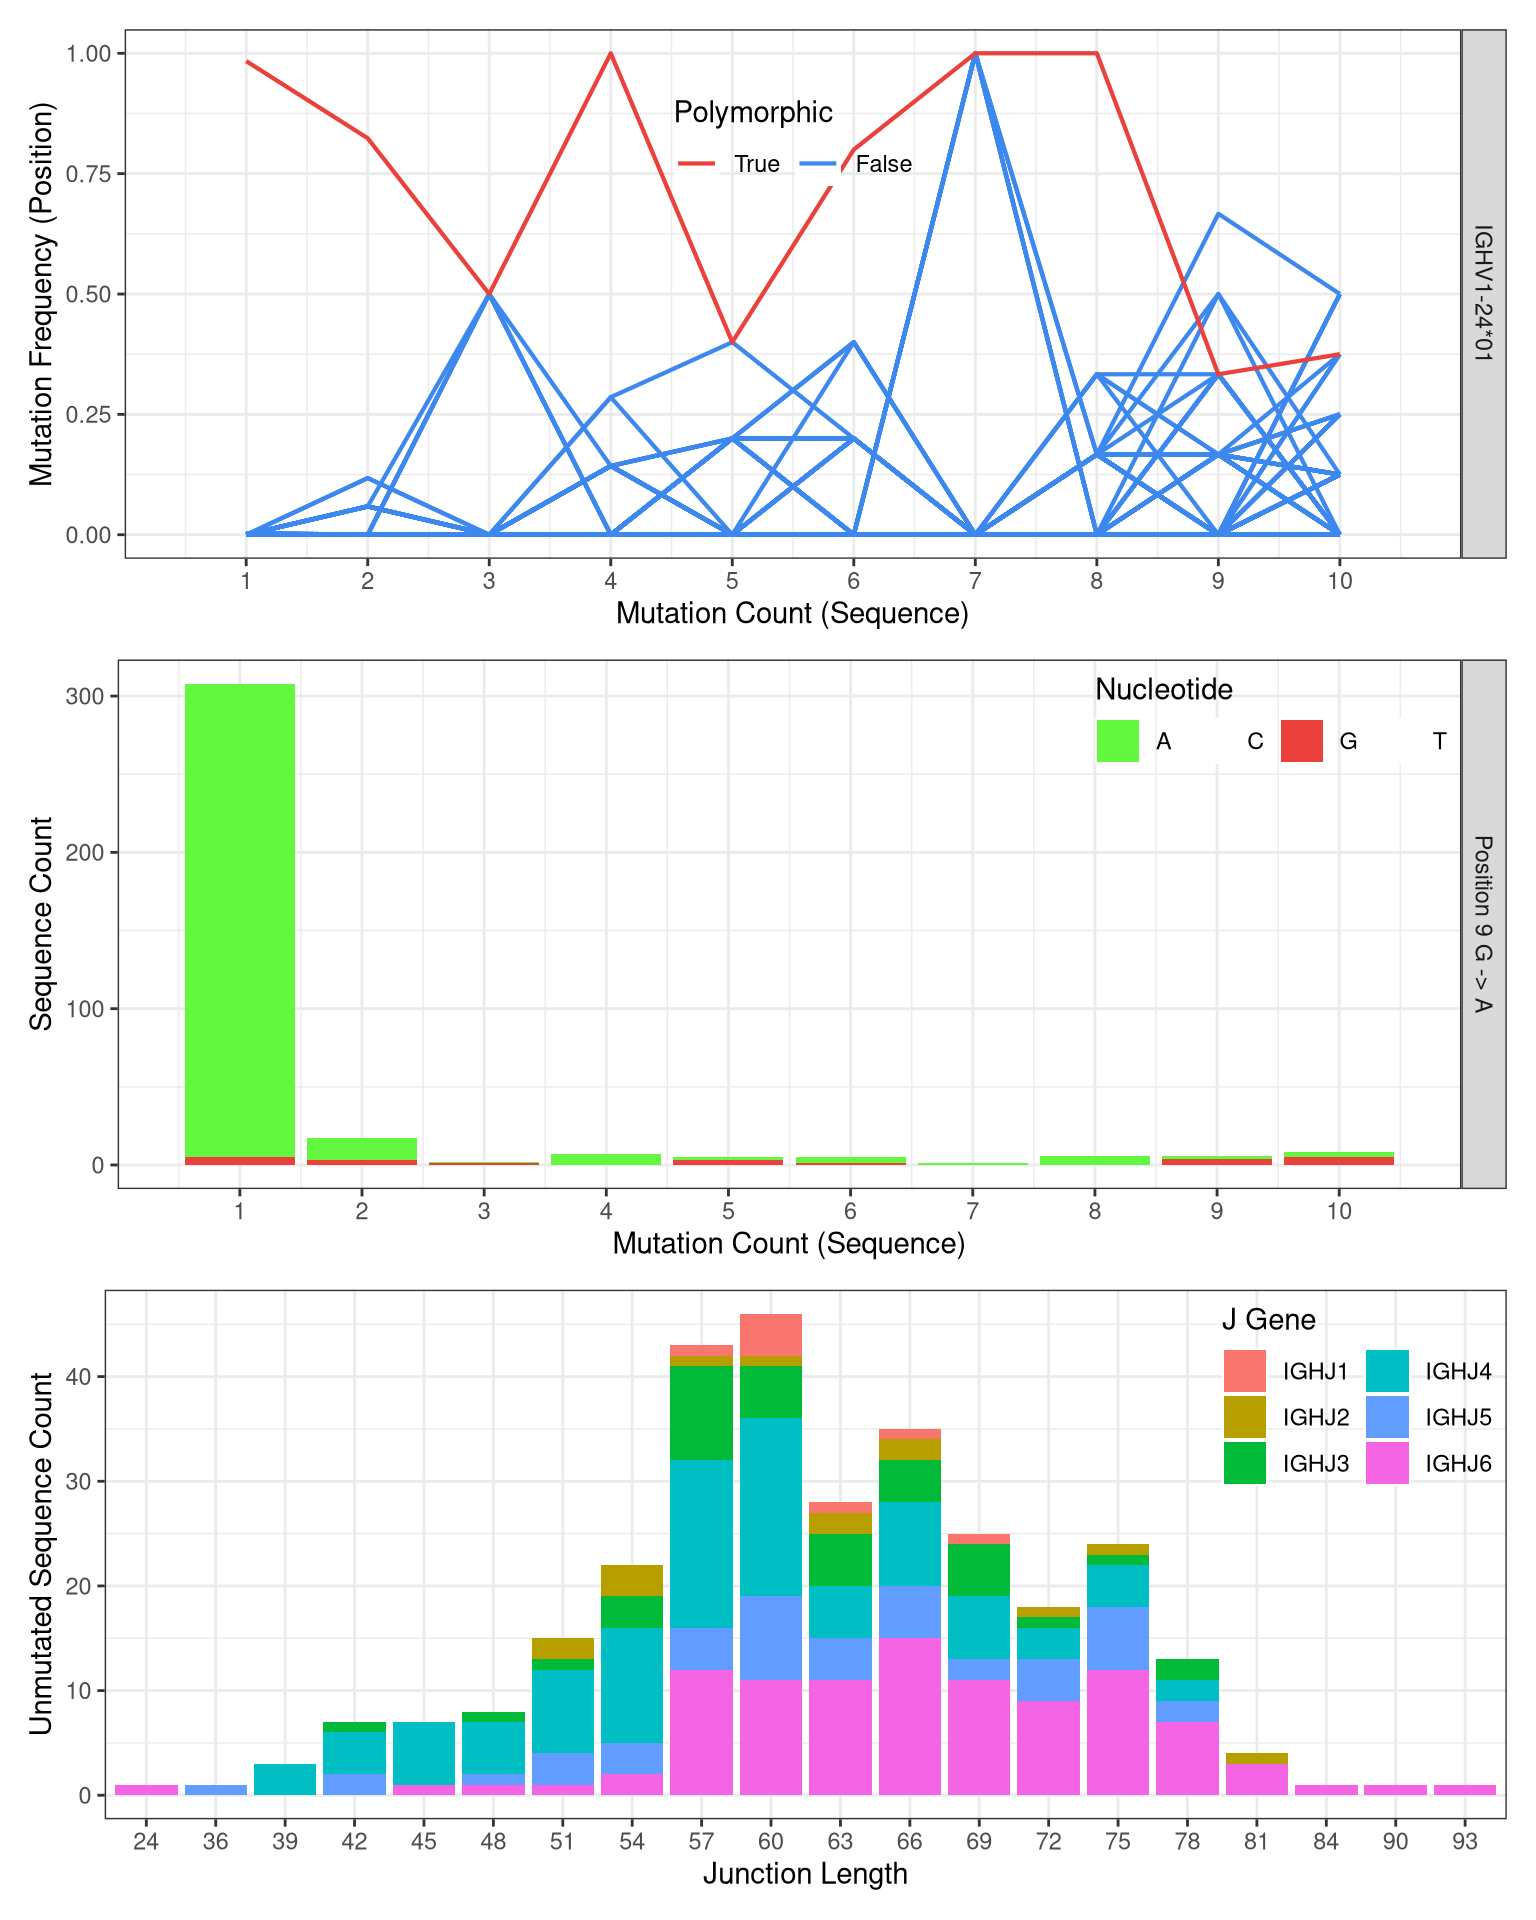
- Three types of evidence are used as criteria by
TigGERto detect a novel allele. You are able to learn more about these evidences from the TigGER tutorial. plots of these evidences for each novel allele can be inspected in the html report in the foldernovel_alleles_and_genotyping/01-novel_allele_inference/subject_id/subject_id_novel_allele_inference_report/index.html.
Example plot summarizing the evidence for novel allele IGHV1-24*01_G9A:
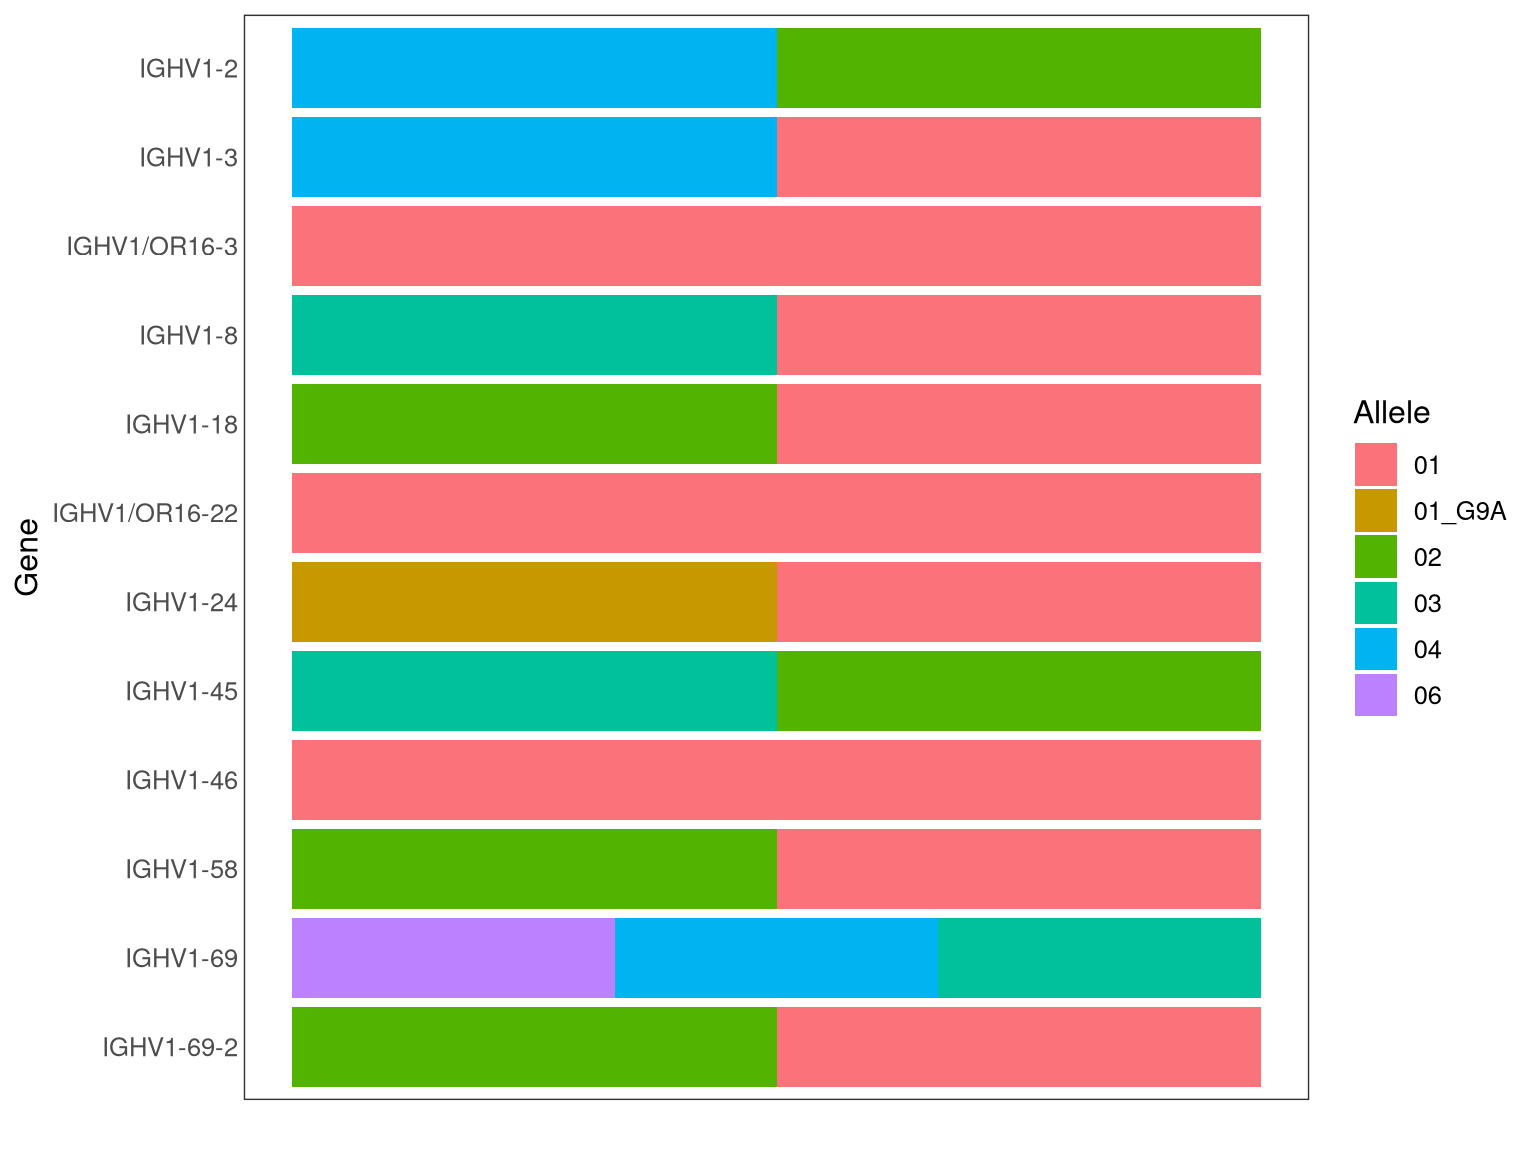
- Genotype inference plots can be found in html report in the folder ‘novel_alleles_and_genotyping/02-genotype_inference/subject_id/subject_id_bayesian_genotype_inference_report/index.html’.
Example plot for a genotype inference result for the V gene: