Devcontainers Introduction
The nf-core repositories hosting tools, modules, and pipelines on GitHub now offer devcontainer configurations that can conveniently run in GitHub Codespaces in a web browser or in Visual Studio Code. Devcontainers offer an easy-to-use environment to develop and test in, that ships with all required software and isolates it from other project environments. Any project folder or file can be mounted and openend inside the container with permissions automatically handled. Being based on docker images, running devcontaners locally requires a docker daemon installed and running.

Running in Github Codespaces
GitHub Codespaces is a browser-based development platform that functions very similarly to a Visual Studio Code instance running locally. A major difference to running locally is that repositories are cloned in to the devcontainer in Codespaces, instead of mounting local folders. In the free tier, the smallest Codespaces instances, which we use in the nf-core/tools repository can run for up to 120 hours per month, but require a Github account. For pipeline repositories, we use more powerful instances with 4 cpu cores, 16GB of RAM, and 32GB of space available by default. These instances, capable of running nf-core pipelines with test profiles, can be up for up to 60 hours per month. More powerful machines are available to paying users (see Codespaces billing).
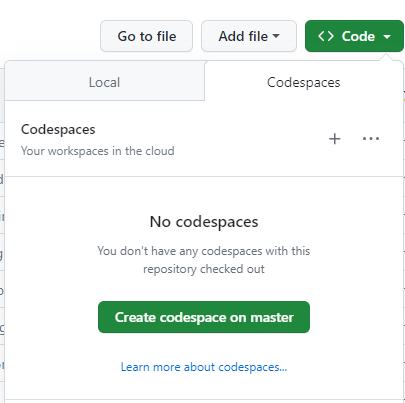
Integrated into GitHub, Codespaces can automatically be used for every nf-core repository. To create a Codespace instance, first click on the button labelled “Code” at the top of any GitHub repository.

This will bring up a dropdown menu, you will then select the Codespaces tab and press the + sign. This will create a Codespace on the current branch of this repository.

After the Codespace is created, you should see a new window in the browser that looks similar to the VS Code IDE.
An important difference between Gitpod and Codespaces is that -profile singularity, and not -profile docker will need to be used to run any nextflow commands. Otherwise, the created codespace can be used almost exactly as you would use a Gitpod environment.
Running in Visual Studio Code
As an alternative to Github Codespaces, devcontainers can also be created and run locally in Visual Studio Code. While no usage limits apply, the required setup to run a devcontainer requires more steps. Most significantly, since the devcontaienrs system is based on docker images, running devcontaners locally requires a docker daemon installed and running. The following steps walk you through setting up VS Code devcontainers on a local machine:
-
Intall Docker Desktop: Docker desktop can be downloaded for Windows, Mac, and Linux on the Docker website. You will have to create an account to use Docker desktop, but not for the headless Docker daemon on Linux.
-
Install VS Code: VS Code can be downloaded from the VS Code website.
-
Install VS Code Remote Development Extension: The remote development pack includes the devcontainers extension and allows VS Code to be used for coding inside development containers. This extension can be downloaded from the VS Code website, or by typing
remote developmentinto theExtension tab search bar.
The extension tab in VS Code can be opened by pressing Ctrl + Shift + X (CMD + Shift + X on mac).
 -
Clone a Repository in Container Volume: Once everything is installed, open both Docker Desktop and VS Code prior going through the steps to create a local Dev Container:
- Navigate to the
Remote Explorer tab in VS Code
 - Click the dropdown menu at the top of the panel and select
Dev Containers
- Press the
+sign under the dropdown menu (this is only visible when the cursor is placed over the banner). - Select
Clone Repository in Container Volumefrom the dropdown menu - Select
GitHubas the remote source, and type the repository name you want to clone (i.e.nf-core/phageannotator) - Select which branch the container should be based on
- Click
+ Create a new colume - Enter the desired volume name (or press
Enterto use default name) - Enter the target folder name (or press
Enterto use the default name)
- Navigate to the
After going through these steps, a new instance of VS Code will be created for your Dev Container! The layout will be similar to Gitpod and Codespaces, so please see nf-core’s Gitpod page for more information about the user interface.
Troubleshooting Tips for Devcontainers
Starting Codespaces from a PR
Error message (in Codespaces):
Codespace could not be created: SKU name 'basicLinux32gb' is not allowed for this repository
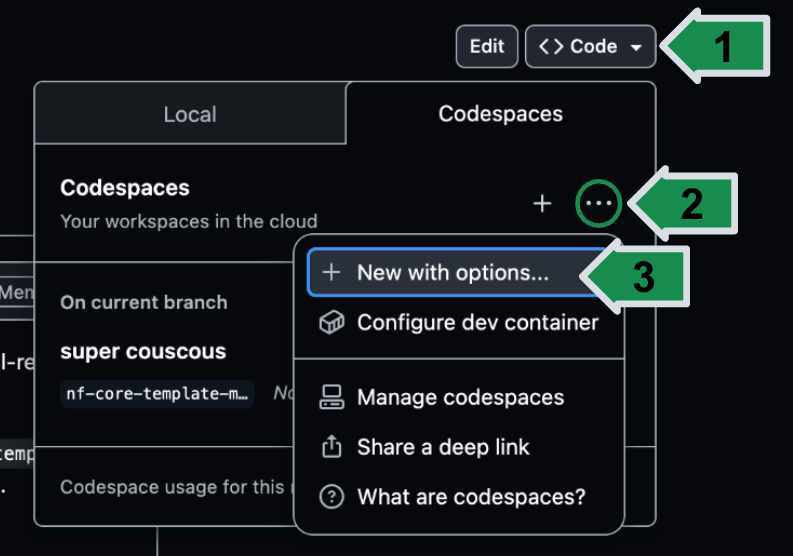
Solution: Try creating the Codespaces instance again using the New with option button. (see below)

Using docker profile in Codespace/VS Code Dev Containers
Error message:
docker: Cannot connect to the Docker daemon at unix:///var/run/docker.sock. Is the docker daemon running?.Solution: Ensure that -profile singularity is used. The docker profile currently does not work in Codespaces or VS Code devcontainers.
Non-privileged status when using singularity profile
Error message:
FATAL: container creation failed: mount hook function failure: mount /proc/self/fd/3->/var/lib/apptainer/mnt/session/rootfs
error: while mounting image /proc/self/fd/3: squashfuse_ll exited with status 1: fuse: device not found, try 'modprobe fuse' first
Solution: Add the following line to the .devcontainer/devcontainer.json file:
"privileged": trueUsing Git in Devcontainers
All nf-core projects use git for version control, which comes pre-installed in devcontainers. This means that changes made in a workspace can be added and commited inside the devcontainer.
In Codespaces, the git installation is already configured and authenticated in a clever way based on the Github account information used when creating an instance.
When running devcontainers locally in VS Code, if no git user and email is set up locally, git asks to provide that information. The VS Code devcontainer extension places this information into the container after it was entered once outside a devcontainer, directly on the local machine. In order to push to a remote reopository, git additionally needs to authenticate against Github. If repositories are cloned via HTTPS, no extra steps are needed.
For using ssh with git, it is required to forward the local machine’s ssh agent or to share keys with the container. Find more details on this and tutorials to follow along in the official VS Code devcontainer docs on sharing git credentials.