nf-core/airrflow
B-cell and T-cell Adaptive Immune Receptor Repertoire (AIRR) sequencing analysis pipeline using the Immcantation framework
3.0). The latest stable release is5.1.0.Usage
Introduction
The nf-core/airrflow pipeline allows processing BCR and TCR targeted sequencing data from bulk and single-cell sequencing protocols. It performs sequence assembly, V(D)J assignment, clonotyping, lineage reconsctruction and repertoire analysis using the Immcantation framework.
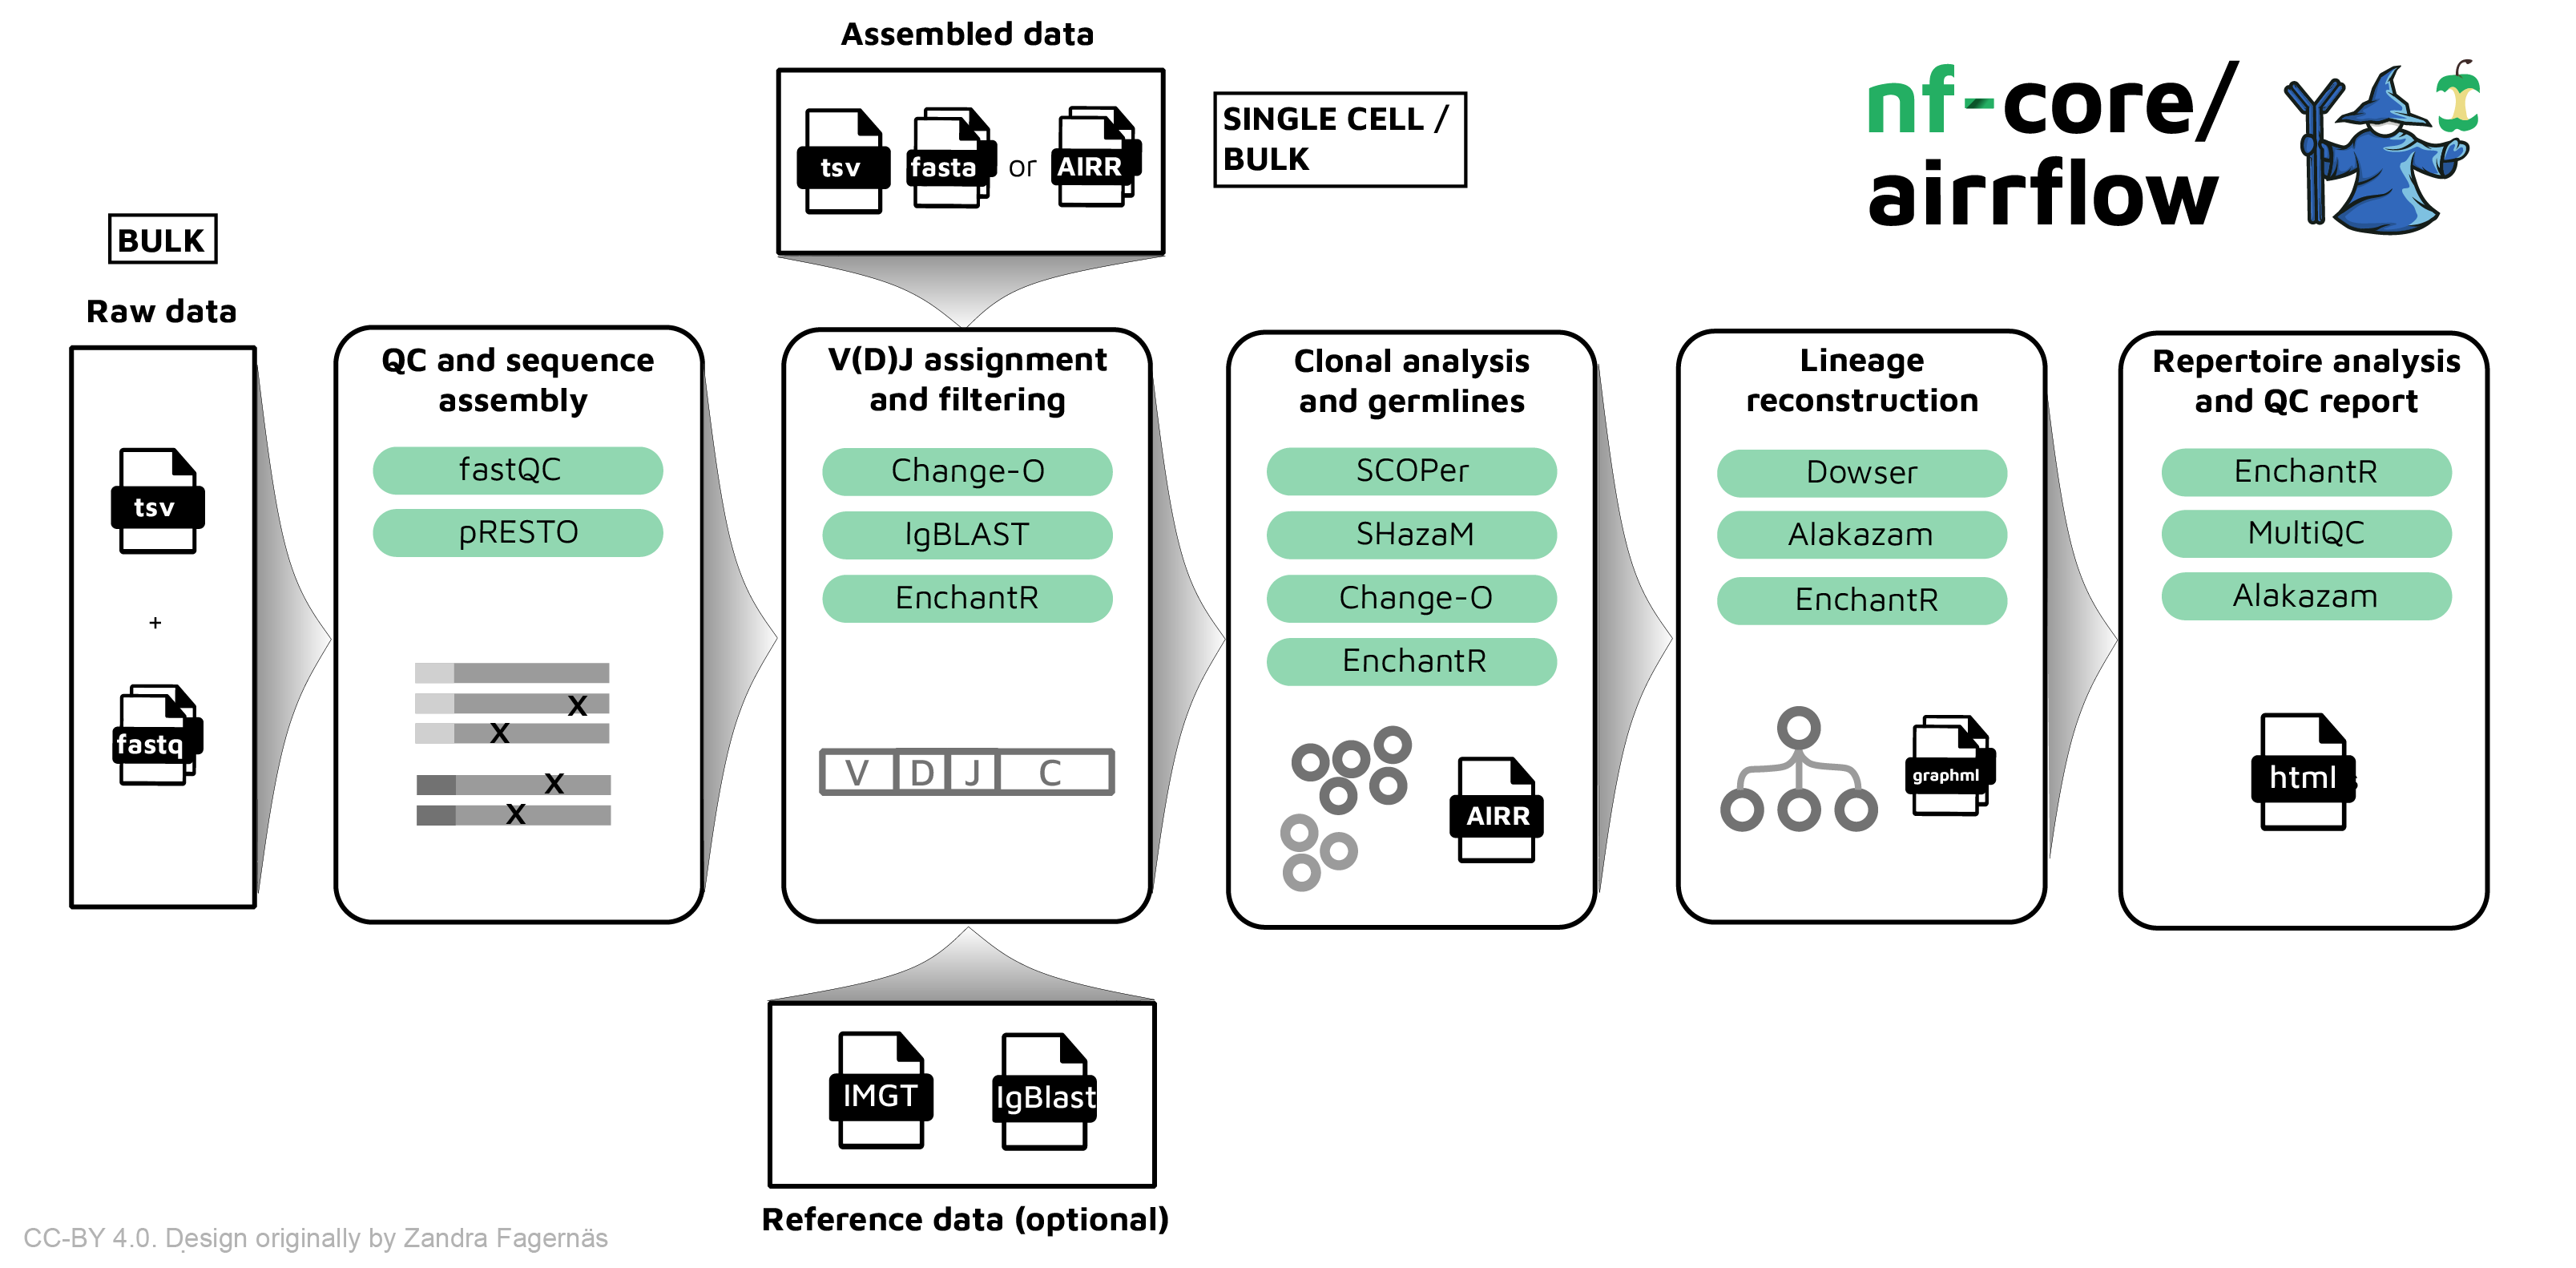
Running the pipeline
The typical command for running the pipeline departing from bulk raw fastq files is as follows:
nextflow run nf-core/airrflow \-profile docker \--mode fastq \--input samplesheet.tsv \--library_generation_method specific_pcr_umi \--cprimers CPrimers.fasta \--vprimers VPrimers.fasta \--umi_length 12 \--max_memory 8.GB \--max_cpus 8 \--outdir ./resultsThe typical command for running the pipeline departing from assembled reads (fasta) or single-cell data (AIRR) is as follows:
nextflow run nf-core/airrflow \-profile docker \--input input_samplesheet.tsv \--mode assembled \--outdir results \--reassign --productive_only --remove_chimeric \--collapseby filename \--cloneby subject_idFor more information about the parameters, please refer to the parameters documentation.
The command above will launch the pipeline with the docker configuration profile. See below for more information about profiles.
Note that the pipeline will create the following files in your working directory:
work # Directory containing the nextflow working files<OUTDIR> # Finished results (configurable, see below).nextflow_log # Log file from Nextflow# Other nextflow hidden files, eg. history of pipeline runs and old logs.Input samplesheet
Fastq input samplesheet (bulk)
The required input file for processing raw BCR or TCR bulk targeted sequencing data is a sample sheet in TSV format (tab separated). The columns sample_id, filename_R1, filename_R2, subject_id, species, tissue, pcr_target_locus, single_cell, sex, age and biomaterial_provider are required. An example samplesheet is:
| sample_id | filename_R1 | filename_R2 | filename_I1 | subject_id | species | pcr_target_locus | tissue | sex | age | biomaterial_provider | single_cell | intervention | collection_time_point_relative | cell_subset |
|---|---|---|---|---|---|---|---|---|---|---|---|---|---|---|
| sample01 | sample1_S8_L001_R1_001.fastq.gz | sample1_S8_L001_R2_001.fastq.gz | sample1_S8_L001_I1_001.fastq.gz | Subject02 | human | IG | blood | NA | 53 | sequencing_facility | FALSE | Drug_treatment | Baseline | plasmablasts |
| sample02 | sample2_S8_L001_R1_001.fastq.gz | sample2_S8_L001_R2_001.fastq.gz | sample2_S8_L001_I1_001.fastq.gz | Subject02 | human | TR | blood | female | 78 | sequencing_facility | FALSE | Drug_treatment | Baseline | plasmablasts |
- sample_id: Sample ID assigned by submitter, unique within study.
- filename_R1: path to fastq file with first mates of paired-end sequencing.
- filename_R2: path to fastq file with second mates of paired-end sequencing.
- filename_I1 (optional): path to fastq with illumina index and UMI (unique molecular identifier) barcode.
- subject_id: Subject ID assigned by submitter, unique within study.
- species: species from which the sample was taken. Supported species are
humanandmouse. - tissue: tissue from which the sample was taken. E.g.
blood,PBMC,brain. - pcr_target_locus: Designation of the target locus (
IGorTR). - sex: Subject biological sex (
female,male, etc.). - age: Subject biological age.
- single_cell: TRUE or FALSE. Fastq input samplesheet only supports a FALSE value.
Other optional columns can be added. These columns will be available when building the contrasts for the repertoire comparison report. It is recommended that these columns also follow the AIRR nomenclature. Examples are:
- intervention: Description of intervention.
- disease_diagnosis: Diagnosis of subject.
- collection_time_point_relative: Time point at which sample was taken, relative to
collection_time_point_reference(e.g. 14d, 6 months, baseline). - collection_time_point_reference: Event in the study schedule to which
Sample collection timerelates to (e.g. primary vaccination, intervention start). - cell_subset: Commonly-used designation of isolated cell population.
The metadata specified in the input file will then be automatically annotated in a column with the same header in the tables generated by the pipeline.
Assembled input samplesheet (bulk or single-cell)
The required input file for processing raw BCR or TCR bulk targeted sequencing data is a sample sheet in TSV format (tab separated). The columns sample_id, filename, subject_id, species, tissue, single_cell, sex, age and biomaterial_provider are required.
An example samplesheet is
| filename | species | subject_id | sample_id | tissue | sex | age | biomaterial_provider | pcr_target_locus | single_cell |
|---|---|---|---|---|---|---|---|---|---|
| sc5p_v2_hs_PBMC_1k_b_airr_rearrangement.tsv | human | subject_x | sc5p_v2_hs_PBMC_1k_5fb | PBMC | NA | NA | 10x Genomics | ig | TRUE |
| sc5p_v2_mm_c57bl6_splenocyte_1k_b_airr_rearrangement.tsv | mouse | mouse_x | sc5p_v2_mm_c57bl6_splenocyte_1k_b | splenocyte | NA | NA | 10x Genomics | ig | TRUE |
| bulk-Laserson-2014.fasta | human | PGP1 | PGP1 | PBMC | male | NA | Laserson-2014 | ig | FALSE |
Supported AIRR metadata fields
nf-core/airrflow offers full support for the AIRR standards 1.4 metadata annotation. The minimum metadata fields that are needed by the pipeline are listed in the table below. Other non-mandatory AIRR fields can be provided in the input samplesheet, which will be available for reporting and introducing comparisons among repertoires.
| AIRR field | Type | Parameter Name | Description |
|---|---|---|---|
| sample_id | Samplesheet column | Sample ID assigned by submitter, unique within study | |
| subject_id | Samplesheet column | Subject ID assigned by submitter, unique within study | |
| species | Samplesheet column | Subject species | |
| tissue | Samplesheet column | Sample tissue | |
| pcr_target_locus | Samplesheet column | Designation of the target locus (IG or TR) | |
| sex | Samplesheet column | Subject sex | |
| age | Samplesheet column | Subject age | |
| biomaterial_provider | Samplesheet column | Name of sample biomaterial provider | |
| library_generation_method | Parameter | --library_generation_method |
Generic type of library generation |
Supported bulk library generation methods (protocols)
When processing bulk sequencing data departing from raw fastq reads, several sequencing protocols are supported which can be provided with the parameter --library_generation_method.
The following table matches the library generation methods as described in the AIRR metadata annotation guidelines to the value that can be provided to the --library_generation_method parameter.
| Library generation methods (AIRR) | Description | Name in pipeline | Commercial protocols |
|---|---|---|---|
| RT(RHP)+PCR | RT-PCR using random hexamer primers | Not supported | |
| RT(oligo-dT)+PCR | RT-PCR using oligo-dT primers | Not supported | |
| RT(oligo-dT)+TS+PCR | 5’-RACE PCR (i.e. RT is followed by a template switch (TS) step) using oligo-dT primers | dt_5p_race | |
| RT(oligo-dT)+TS(UMI)+PCR | 5’-RACE PCR using oligo-dT primers and template switch primers containing UMI | dt_5p_race_umi | TAKARA SMARTer TCR v2, TAKARA SMARTer BCR |
| RT(specific)+PCR | RT-PCR using transcript-specific primers | specific_pcr | |
| RT(specific)+TS+PCR | 5’-RACE PCR using transcript- specific primers | Not supported | |
| RT(specific)+TS(UMI)+PCR | 5’-RACE PCR using transcript- specific primers and template switch primers containing UMIs | Not supported | |
| RT(specific+UMI)+PCR | RT-PCR using transcript-specific primers containing UMIs | specific_pcr_umi | |
| RT(specific+UMI)+TS+PCR | 5’-RACE PCR using transcript- specific primers containing UMIs | Not supported | |
| RT(specific)+TS | RT-based generation of dsDNA without subsequent PCR. This is used by RNA-seq kits. | Not supported |
Multiplex specific PCR (with or without UMI)
This sequencing type requires setting --library_generation_method specific_pcr_umi if UMI barcodes were used, or --library_generation_method specific_pcr if no UMI barcodes were used (sans-umi). If the option without UMI barcodes is selected, the UMI length will be set automatically to 0.
It is required to provide the sequences for the V-region primers as well as the C-region primers used in the specific PCR amplification. Some examples of UMI and barcode configurations are provided. Depending on the position of the C-region primer, V-region primers and UMI barcodes, there are several possibilities detailed in the following subsections.
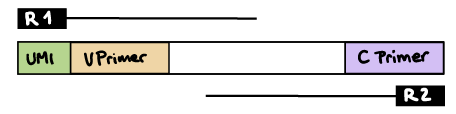
R1 read contains C primer (and UMI barcode)
The --cprimer_position and --umi_position (if UMIs are used) parameters need to be set to R1 (this is the default).
If there are extra bases between the UMI barcode and C primer, specify the number of bases with the --cprimer_start parameter (default zero). Set --cprimer_position R1 (this is the default).

nextflow run nf-core/airrflow -profile docker \--input samplesheet.tsv \--library_generation_method specific_pcr_umi \--cprimers CPrimers.fasta \--vprimers VPrimers.fasta \--umi_length 12 \--umi_position R1 \--cprimer_start 0 \--cprimer_position R1 \--outdir ./resultsIf UMIs are not used:
nextflow run nf-core/airrflow -profile docker \--input samplesheet.tsv \--library_generation_method specific_pcr \--cprimers CPrimers.fasta \--vprimers VPrimers.fasta \--cprimer_start 0 \--cprimer_position R1 \--outdir ./resultsR1 read contains V primer (and UMI barcode)
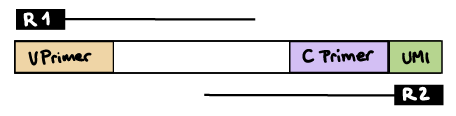
The --umi_position parameter needs to be set to R1 (if UMIs are used), and --cprimer_position to R2.
If there are extra bases between the UMI barcode and V primer, specify the number of bases with the --vprimer_start parameter (default zero).
nextflow run nf-core/airrflow -profile docker \--input samplesheet.tsv \--library_generation_method specific_pcr_umi \--cprimers CPrimers.fasta \--vprimers VPrimers.fasta \--umi_length 12 \--umi_position R1 \--vprimer_start 0 \--cprimer_position R2 \--outdir ./resultsIf UMIs are not used:
nextflow run nf-core/airrflow -profile docker \--input samplesheet.tsv \--library_generation_method specific_pcr \--cprimers CPrimers.fasta \--vprimers VPrimers.fasta \--vprimer_start 0 \--cprimer_position R2 \--outdir resultsR2 read contains C primer (and UMI barcode)
The --umi_position and --cprimer_position parameters need to be set to R2.
If there are extra bases between the UMI barcode and C primer, specify the number of bases with the --cprimer_start parameter (default zero).
nextflow run nf-core/airrflow -profile docker \--input samplesheet.tsv \--library_generation_method specific_pcr_umi \--cprimers CPrimers.fasta \--vprimers VPrimers.fasta \--umi_length 12 \--umi_position R2 \--cprimer_start 0 \--cprimer_position R2 \--outdir ./resultsUMI barcode is provided in the index file
If the UMI barcodes are provided in an additional index file, please provide it in the column filename_I1 in the input samplesheet and additionally set the --index_file parameter. Specify the UMI barcode length with the --umi_length parameter. You can optionally specify the UMI start position in the index sequence with the --umi_start parameter (the default is 0).
For example:
nextflow run nf-core/airrflow -profile docker \--input samplesheet.tsv \--library_generation_method specific_pcr_umi \--cprimers Cprimers.fasta \--vprimers Vprimers.fasta \--cprimer_position R1 \--index_file \--umi_length 12 \--umi_start 6 \--outdir ./resultsdT-Oligo RT and 5’RACE PCR
This sequencing type requires setting --library_generation_method race_5p_umi or --library_generation_method race_5p_umi if UMIs are not being employed, and providing sequences for the C-region primers as well as the linker or template switch oligo sequences with the parameter --race_linker. Examples are provided below to run airrflow to process amplicons generated with the TAKARA 5’RACE SMARTer Human BCR and TCR protocols (library structure schema shown below).
Takara Bio SMARTer Human BCR
The read configuration when sequenicng with the TAKARA Bio SMARTer Human BCR protocol is the following:

nextflow run nf-core/airrflow -profile docker \--input samplesheet.tsv \--library_generation_method dt_5p_race_umi \--cprimers CPrimers.fasta \--race_linker linker.fasta \--umi_length 12 \--umi_position R2 \--cprimer_start 7 \--cprimer_position R1 \--outdir ./resultsTakara Bio SMARTer Human TCR v2
The read configuration when sequencing with the Takara Bio SMARTer Human TCR v2 protocol is the following:
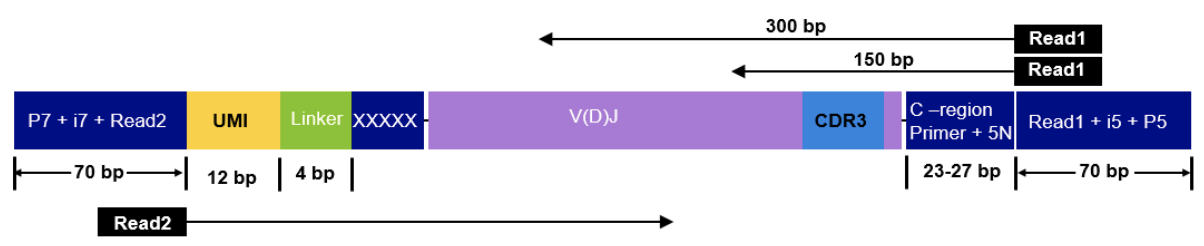
nextflow run nf-core/airrflow -profile docker \--input samplesheet.tsv \--library_generation_method dt_5p_race_umi \--cprimers CPrimers.fasta \--race_linker linker.fasta \--umi_length 12 \--umi_position R2 \--cprimer_start 5 \--cprimer_position R1 \--outdir ./resultsFor this protocol, the takara linkers are:
>takara-linkerGTACAnd the C-region primers are:
>TRACCAGGGTCAGGGTTCTGGATATN>TRBCGGAACACSTTKTTCAGGTCCTC>TRDCGTTTGGTATGAGGCTGACTTCN>TRGCCATCTGCATCAAGTTGTTTATCUMI barcode handling
Unique Molecular Identifiers (UMIs) enable the quantification of BCR or TCR abundance in the original sample by allowing to distinguish PCR duplicates from original sample duplicates. The UMI indices are random nucleotide sequences of a pre-determined length that are added to the sequencing libraries before any PCR amplification steps, for example as part of the primer sequences.
The UMI barcodes are typically read from an index file but sometimes can be provided at the start of the R1 or R2 reads:
-
UMIs in the index file: if the UMI barcodes are provided in an additional index file, set the
--index_fileparameter. Specify the UMI barcode length with the--umi_lengthparameter. You can optionally specify the UMI start position in the index sequence with the--umi_startparameter (the default is 0). -
UMIs in R1 or R2 reads: if the UMIs are contained within the R1 or R2 reads, set the
--umi_positionparameter toR1orR2, respectively. Specify the UMI barcode length with the--umi_lengthparameter. -
No UMIs in R1 or R2 reads: if no UMIs are present in the samples, specify
--umi_length 0to use the sans-UMI subworkflow.
Updating the pipeline
When you run the above command, Nextflow automatically pulls the pipeline code from GitHub and stores it as a cached version. When running the pipeline after this, it will always use the cached version if available - even if the pipeline has been updated since. To make sure that you’re running the latest version of the pipeline, make sure that you regularly update the cached version of the pipeline:
nextflow pull nf-core/airrflowReproducibility
It is a good idea to specify a pipeline version when running the pipeline on your data. This ensures that a specific version of the pipeline code and software are used when you run your pipeline. If you keep using the same tag, you’ll be running the same version of the pipeline, even if there have been changes to the code since.
First, go to the nf-core/airrflow releases page and find the latest pipeline version - numeric only (eg. 1.3.1). Then specify this when running the pipeline with -r (one hyphen) - eg. -r 1.3.1. Of course, you can switch to another version by changing the number after the -r flag.
This version number will be logged in reports when you run the pipeline, so that you’ll know what you used when you look back in the future. For example, at the bottom of the MultiQC reports.
Core Nextflow arguments
NB: These options are part of Nextflow and use a single hyphen (pipeline parameters use a double-hyphen).
-profile
Use this parameter to choose a configuration profile. Profiles can give configuration presets for different compute environments.
Several generic profiles are bundled with the pipeline which instruct the pipeline to use software packaged using different methods (Docker, Singularity, Podman, Shifter, Charliecloud, Conda) - see below.
We highly recommend the use of Docker or Singularity containers for full pipeline reproducibility, however when this is not possible, Conda is also supported.
The pipeline also dynamically loads configurations from https://github.com/nf-core/configs when it runs, making multiple config profiles for various institutional clusters available at run time. For more information and to see if your system is available in these configs please see the nf-core/configs documentation.
Note that multiple profiles can be loaded, for example: -profile test,docker - the order of arguments is important!
They are loaded in sequence, so later profiles can overwrite earlier profiles.
If -profile is not specified, the pipeline will run locally and expect all software to be installed and available on the PATH. This is not recommended, since it can lead to different results on different machines dependent on the computer enviroment.
test- A profile with a complete configuration for automated testing
- Includes links to test data so needs no other parameters
docker- A generic configuration profile to be used with Docker
singularity- A generic configuration profile to be used with Singularity
podman- A generic configuration profile to be used with Podman
shifter- A generic configuration profile to be used with Shifter
charliecloud- A generic configuration profile to be used with Charliecloud
conda- A generic configuration profile to be used with Conda. Please only use Conda as a last resort i.e. when it’s not possible to run the pipeline with Docker, Singularity, Podman, Shifter or Charliecloud.
-resume
Specify this when restarting a pipeline. Nextflow will use cached results from any pipeline steps where the inputs are the same, continuing from where it got to previously. For input to be considered the same, not only the names must be identical but the files’ contents as well. For more info about this parameter, see this blog post.
You can also supply a run name to resume a specific run: -resume [run-name]. Use the nextflow log command to show previous run names.
-c
Specify the path to a specific config file (this is a core Nextflow command). See the nf-core website documentation for more information.
Custom configuration
Resource requests
Whilst the default requirements set within the pipeline will hopefully work for most people and with most input data, you may find that you want to customise the compute resources that the pipeline requests. Each step in the pipeline has a default set of requirements for number of CPUs, memory and time. For most of the steps in the pipeline, if the job exits with any of the error codes specified here it will automatically be resubmitted with higher requests (2 x original, then 3 x original). If it still fails after the third attempt then the pipeline execution is stopped.
For example, if the nf-core/rnaseq pipeline is failing after multiple re-submissions of the STAR_ALIGN process due to an exit code of 137 this would indicate that there is an out of memory issue:
[62/149eb0] NOTE: Process `NFCORE_RNASEQ:RNASEQ:ALIGN_STAR:STAR_ALIGN (WT_REP1)` terminated with an error exit status (137) -- Execution is retried (1)Error executing process > 'NFCORE_RNASEQ:RNASEQ:ALIGN_STAR:STAR_ALIGN (WT_REP1)'
Caused by:    Process `NFCORE_RNASEQ:RNASEQ:ALIGN_STAR:STAR_ALIGN (WT_REP1)` terminated with an error exit status (137)
Command executed:    STAR \        --genomeDir star \        --readFilesIn WT_REP1_trimmed.fq.gz  \        --runThreadN 2 \        --outFileNamePrefix WT_REP1. \        <TRUNCATED>
Command exit status:    137
Command output:    (empty)
Command error:    .command.sh: line 9:  30 Killed    STAR --genomeDir star --readFilesIn WT_REP1_trimmed.fq.gz --runThreadN 2 --outFileNamePrefix WT_REP1. <TRUNCATED>Work dir:    /home/pipelinetest/work/9d/172ca5881234073e8d76f2a19c88fb
Tip: you can replicate the issue by changing to the process work dir and entering the command `bash .command.run`
For beginners
A first step to bypass this error, you could try to increase the amount of CPUs, memory, and time for the whole pipeline. Therefor you can try to increase the resource for the parameters --max_cpus, --max_memory, and --max_time. Based on the error above, you have to increase the amount of memory. Therefore you can go to the parameter documentation of rnaseq and scroll down to the show hidden parameter button to get the default value for --max_memory. In this case 128GB, you than can try to run your pipeline again with --max_memory 200GB -resume to skip all process, that were already calculated. If you can not increase the resource of the complete pipeline, you can try to adapt the resource for a single process as mentioned below.
Advanced option on process level
To bypass this error you would need to find exactly which resources are set by the STAR_ALIGN process. The quickest way is to search for process STAR_ALIGN in the nf-core/rnaseq Github repo.
We have standardised the structure of Nextflow DSL2 pipelines such that all module files will be present in the modules/ directory and so, based on the search results, the file we want is modules/nf-core/star/align/main.nf.
If you click on the link to that file you will notice that there is a label directive at the top of the module that is set to label process_high.
The Nextflow label directive allows us to organise workflow processes in separate groups which can be referenced in a configuration file to select and configure subset of processes having similar computing requirements.
The default values for the process_high label are set in the pipeline’s base.config which in this case is defined as 72GB.
Providing you haven’t set any other standard nf-core parameters to cap the maximum resources used by the pipeline then we can try and bypass the STAR_ALIGN process failure by creating a custom config file that sets at least 72GB of memory, in this case increased to 100GB.
The custom config below can then be provided to the pipeline via the -c parameter as highlighted in previous sections.
process { withName: 'NFCORE_RNASEQ:RNASEQ:ALIGN_STAR:STAR_ALIGN' { memory = 100.GB }}NB: We specify the full process name i.e.
NFCORE_RNASEQ:RNASEQ:ALIGN_STAR:STAR_ALIGNin the config file because this takes priority over the short name (STAR_ALIGN) and allows existing configuration using the full process name to be correctly overridden.If you get a warning suggesting that the process selector isn’t recognised check that the process name has been specified correctly.
Updating containers (advanced users)
The Nextflow DSL2 implementation of this pipeline uses one container per process which makes it much easier to maintain and update software dependencies. If for some reason you need to use a different version of a particular tool with the pipeline then you just need to identify the process name and override the Nextflow container definition for that process using the withName declaration. For example, in the nf-core/viralrecon pipeline a tool called Pangolin has been used during the COVID-19 pandemic to assign lineages to SARS-CoV-2 genome sequenced samples. Given that the lineage assignments change quite frequently it doesn’t make sense to re-release the nf-core/viralrecon everytime a new version of Pangolin has been released. However, you can override the default container used by the pipeline by creating a custom config file and passing it as a command-line argument via -c custom.config.
-
Check the default version used by the pipeline in the module file for Pangolin
-
Find the latest version of the Biocontainer available on Quay.io
-
Create the custom config accordingly:
-
For Docker:
process {withName: PANGOLIN {container = 'quay.io/biocontainers/pangolin:3.0.5--pyhdfd78af_0'}} -
For Singularity:
process {withName: PANGOLIN {container = 'https://depot.galaxyproject.org/singularity/pangolin:3.0.5--pyhdfd78af_0'}} -
For Conda:
process {withName: PANGOLIN {conda = 'bioconda::pangolin=3.0.5'}}
-
NB: If you wish to periodically update individual tool-specific results (e.g. Pangolin) generated by the pipeline then you must ensure to keep the
work/directory otherwise the-resumeability of the pipeline will be compromised and it will restart from scratch.
nf-core/configs
In most cases, you will only need to create a custom config as a one-off but if you and others within your organisation are likely to be running nf-core pipelines regularly and need to use the same settings regularly it may be a good idea to request that your custom config file is uploaded to the nf-core/configs git repository. Before you do this please can you test that the config file works with your pipeline of choice using the -c parameter. You can then create a pull request to the nf-core/configs repository with the addition of your config file, associated documentation file (see examples in nf-core/configs/docs), and amending nfcore_custom.config to include your custom profile.
See the main Nextflow documentation for more information about creating your own configuration files.
If you have any questions or issues please send us a message on Slack on the #configs channel.
Running in the background
Nextflow handles job submissions and supervises the running jobs. The Nextflow process must run until the pipeline is finished.
The Nextflow -bg flag launches Nextflow in the background, detached from your terminal so that the workflow does not stop if you log out of your session. The logs are saved to a file.
Alternatively, you can use screen / tmux or similar tool to create a detached session which you can log back into at a later time.
Some HPC setups also allow you to run nextflow within a cluster job submitted your job scheduler (from where it submits more jobs).
Nextflow memory requirements
In some cases, the Nextflow Java virtual machines can start to request a large amount of memory.
We recommend adding the following line to your environment to limit this (typically in ~/.bashrc or ~./bash_profile):
NXF_OPTS='-Xms1g -Xmx4g'