In this tutorial we will see how to create a new module for the nf-core modules repository. As an example, we will create a module to execute the FastqToBam function of the FGBIO suite of tools.
Introduction
If you create a new module with the goal of contributing the code to nf-core, we recommend to familiarise with the community guidelines and use nf-core tools as explained below.
Module guidelines
The nf-core community has agreed on a minimal set of guidelines, intended to make module most suitable for general use, i.e. to be shared across a wide variety of community workflows.
nf-core tools
Using nf-core tools is the best way to adhere to the guidelines, without worrying too much and writing things from scratch. On the website you can find more details about installation, and all functionalities for modules.
Test data
Even before beginning the development of a module, you should identify a small dataset you can use to test its functionality. Ideally, the dataset is existing already and can be shared with other test workflows for other modules.
♻️ This is in active development, keep an eye for available test data here and how to access them using a config file (see this change).
If you must create your own test data, make sure you follow the test data guidelines.
Fork the nf-core/modules repository and branch
The first step, to contribute a module to the community repository is to fork *nf-core modules into your own account or organisation. To do this, you should click on the top-right of the nf-core modules repository, and choose “fork” as shown in the figure below.

You then choose the account or organisation you want to fork the repository into. Once forked, you can commit all changes you need into the new repository.
In order to create a new module, it is best to branch the code into a recognisable branch. You can do this in two ways.
-
You can create a new branch locally, on the terminal, using the following command:
-
git checkout -b newmodule ## alternatively: git switch -c newmodule -
The branch will be synchronised with your remote once you push the first new commit.
-
-
You can use the GitHub interface
-
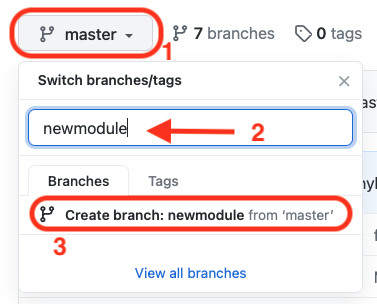
To do this, you can select the dropdown menu on the top-left of your repository code, write the name of the new branch and choose to create it as shown below:
-
You will then sync this locally (ideally, you clone the forked repository on your working environment to edit code more comfortably)
-
Create the module template
Using nf-core/tools it is very easy to create a new module. In our example, we change directory into the repository (modules) and we type
nf-core modules create fgbio/demofastqtobam- The first word indicates the tool (i.e. the software or suite)
- We separate the keys by a forward slash (
/) - The second word indicates the function of the tool we are creating a module for
nf-core tools will set up an empty module for you based on a template. Follow the instructions on the command-line and a new module will be created in the fgbio folder.
One parameter you have to specify during the creation is the process resource label based on the process label in the base.config files in workflows. You have to select one of the following labels:
- process_single
- process_low
- process_medium
- process_high
- process_long
- process_high_memory
For now can just select the default and continue.
In the next step you have to specify if you need a meta map with sample-specific information. Our test module will need a meta map, so select yes for the moment. If you want to know what exactly meta maps are check out the documentation here.
Magic will happen now: nf-core tools will create the following entries for the code of the module itself and also for the testing of the module
modules
    └── nf-core
        └── fgbio
            └── demofastqtobam
                ├── main.nf
                ├── meta.yml
                └── tests
                    ├── main.nf.test
                    └── tags.yml
Each of the files is pre-filled according to a defined nf-core template.
You fill find a number of commented sections in the file, to help you modify the code while adhering to the guidelines, as you can appreciate in the following figure.
// TODO nf-core: If in doubt look at other nf-core/modules to see how we are doing things! :)
//               https://github.com/nf-core/modules/tree/master/modules
//               You can also ask for help via your pull request or on the #modules channel on the nf-core Slack workspace:
//               https://nf-co.re/join
// TODO nf-core: A module file SHOULD only define input and output files as command-line parameters.
//               All other parameters MUST be provided using the "task.ext" directive, see here:
//               https://www.nextflow.io/docs/latest/process.html#ext
//               where "task.ext" is a string.
//               Any parameters that need to be evaluated in the context of a particular sample
//               e.g. single-end/paired-end data MUST also be defined and evaluated appropriately.
// TODO nf-core: Software that can be piped together SHOULD be added to separate module files
//               unless there is a run-time, storage advantage in implementing in this way
//               e.g. it's ok to have a single module for bwa to output BAM instead of SAM:
//                 bwa mem | samtools view -B -T ref.fasta
// TODO nf-core: Optional inputs are not currently supported by Nextflow. However, using an empty
//               list (`[]`) instead of a file can be used to work around this issue.

process FGBIO_DEMOFASTQTOBAM {
    tag "$meta.id"
    label 'process_single'

    // TODO nf-core: List required Conda package(s).
    //               Software MUST be pinned to channel (i.e. "bioconda"), version (i.e. "1.10").
    //               For Conda, the build (i.e. "h9402c20_2") must be EXCLUDED to support installation on different operating systems.
    // TODO nf-core: See section in main README for further information regarding finding and adding container addresses to the section below.
    conda (params.enable_conda ? "bioconda::fgbio=2.0.2" : null)
    container "${ workflow.containerEngine == 'singularity' && !task.ext.singularity_pull_docker_container ?
        'https://depot.galaxyproject.org/singularity/YOUR-TOOL-HERE':
        'quay.io/biocontainers/YOUR-TOOL-HERE' }"

    input:
    // TODO nf-core: Where applicable all sample-specific information e.g. "id", "single_end", "read_group"
    //               MUST be provided as an input via a Groovy Map called "meta".
    //               This information may not be required in some instances e.g. indexing reference genome files:
    //               https://github.com/nf-core/modules/blob/master/modules/bwa/index/main.nf
    // TODO nf-core: Where applicable please provide/convert compressed files as input/output
    //               e.g. "*.fastq.gz" and NOT "*.fastq", "*.bam" and NOT "*.sam" etc.
    tuple val(meta), path(bam)

    output:
    // TODO nf-core: Named file extensions MUST be emitted for ALL output channels
    tuple val(meta), path("*.bam"), emit: bam
    // TODO nf-core: List additional required output channels/values here
    path "versions.yml"           , emit: versions

    when:
    task.ext.when == null || task.ext.when
The above represents the main code of your module, which will need to be changed. NF-core tools will attempt at retrieving the correct containers (for Docker and for Singularity) as well as the Conda recipe, and those files will be pre-filled for you.
Now you just have to write the code.
Write the code
FGBIO command line for the function FastqToBam looks like the following:
fgbio --tmp-dir=tmpFolder \\
    FastqToBam \\
    -i read1.fastq.gz read2.fastq.gz \\
    -o "sampleID_umi_converted.bam" \\
    --read-structures "+T 12M11S+T" \\
    --sample "sampleID" \\
    --library "sampleID"
Here you should first identify:
- the inputs you need, which are mandatory
- the inputs / arguments, which are optional
- the outputs
- any value or variable you might need, associated with the sample (for example, the sample ID or other metadata)
Make sure to check the guidelines for what you should and should not include.
Inputs and Outputs
As described in the guidelines, any information that will differ between multiple runs of the same module in a workflow (e.g. when a module is run across many samples as in fgbio) should be passed as an input, as part of a groovy map called meta. This is part of a tuple which includes the read file(s).
In our case, FGBIO also has a mandatory argument, which is not sample-specific, i.e. the read structure: this refers to the position and structure of the UMI barcode in the read. Such information will be the same for all samples and characteristics of the kit used to prepare the sequencing library. Since it is not sample specific, we will not include it in the meta map. Since it is a mandatory argument, we have decided to add it to the input list: in this way, it will be visible to others who wish to reuse this module, and it will be described explicitly in the metadata YAML file.
Therefore, once we modify the template accordingly, our inputs and outputs will look like this:
input:
    tuple val(meta), path(reads)
    val(read_structure)

output:
    tuple val(meta), path("*_umi_converted.bam"), emit: umibam
    path "*.version.txt"                        , emit: version
Passing optional args
Within nf-core modules any optional non-file parameters should be passed within a variable called args. At a pipeline level, these arguments are pulled into the modules via an ext.args variable that is defined in a modules.conf file. The task in task.ext.args and task.ext.prefix refers to the name of your module.
    script:
    def args = task.ext.args ?: ''
    def prefix = task.ext.prefix ?: "${meta.id}"
We now can substitute all our parameters with our predefined inputs, outputs and args. With the modules.conf every other user can run the module with the additionel arguments of choice. After the substitutions the code of the script looks as follows:
mkdir tmpFolder

fgbio --tmp-dir=${PWD}/tmpFolder \\
    FastqToBam \\
    $args \\
    -i ${reads} \\
    -o "${prefix}_umi_converted.bam" \\
    --read-structures $read_structure \\
    --sample ${meta.id} \\
    --library ${meta.id}
Export the version of the tool
Before wrapping up our code, we need to add a line to output the software version. This must go in the HEREDOC section of the end of the script block.
    cat <<-END_VERSIONS > versions.yml
    "${task.process}":
        fgbio: \$(samtools --version | sed '1!d; s/samtools \$//')
END_VERSIONSNote the template you generate will include an example samtools command! Make sure to replace this!
Usually a software prints their version with a code similar to this
tool --versionHowever, in some cases the software outputs the version as stderr and causes an exit that is recognised by Nextflow as if the process ended with an error.
In order to avoid that, we can in general print the version as part of an echo statement, like this
echo \$(tool --version 2>&1)or pipe the output as follow
tool --version |& sed 'pattern'Notice the escape \$ of the first $ sign to distinguish between bash variables and nextflow variables.
sed '3!d'Extracts only line 3 of the output printed bysamtools --version- Determine whether the error printed to stderr or stdout, by trying to filter the line with
sed
samtools --version
# Try filtering the specific line
samtools --version | sed '1!d'- If it works, then you’re reading from stdout, otherwise you need to capture stderr using
|&which is shorthand for2>&1 | sed 's/pattern/replacement/'can be used to remove parts of a string..matches any character,+matches 1 or more times.- You can separate sed commands using
;. Often the pattern :sed filter line ; replace stringis enough to get the version number - It is not necessary to use
echo - For non-zero error code:
command --version || trueorcommand --version | sed ... || true - If the version is at a specific line you can try
sed -nr '/pattern/p'that will return only the line with the pattern - To extract the version number in the middle you can also use regex pattern with
grepas follows:grep -o -E '([0-9]+.){1,2}[0-9]' - If multiple lines are returned you can select the first one with
tool --version | head -n 1
Unfortunately, FGBIO manages to cause an error exit even with this solution, and we are therefore forced to use a few bash tricks to re-route the version and format it to be just the semantic number.
    cat <<-END_VERSIONS > versions.yml
    "${task.process}":
        fgbio: \$( echo \$(fgbio --version 2>&1 | tr -d '[:cntrl:]' ) | sed -e 's/^.*Version: //;s/\\[.*\$//')
    END_VERSIONS
This may take a bit of time to get right.
Once that’s complete, our final script will therefore look like this:
process FGBIO_FASTQTOBAM {
    tag "$meta.id"
    label 'process_low'

    conda "bioconda::fgbio=2.0.2"
    container "${ workflow.containerEngine == 'singularity' && !task.ext.singularity_pull_docker_container ?
        'https://depot.galaxyproject.org/singularity/fgbio:2.0.2--hdfd78af_0' :
        'biocontainers/fgbio:2.0.2--hdfd78af_0' }"

    input:
    tuple val(meta), path(reads)

    output:
    tuple val(meta), path("*.bam") , emit: bam , optional: true
    tuple val(meta), path("*.cram"), emit: cram, optional: true
    path "versions.yml"            , emit: versions

    when:
    task.ext.when == null || task.ext.when

    script:
    def args = task.ext.args ?: ''
    def prefix = task.ext.prefix ?: "${meta.id}"

    def sample_name = args.contains("--sample") ? "" : "--sample ${prefix}"
    def library_name = args.contains("--library") ? "" : "--library ${prefix}"
    def output = prefix =~ /\.(bam|cram)$/ ? prefix : "${prefix}.bam"
    """
    fgbio \\
        --tmp-dir=. \\
        FastqToBam \\
        ${args} \\
        --input ${reads} \\
        --output ${output} \\
        ${sample_name} \\
        ${library_name}

    cat <<-END_VERSIONS > versions.yml
    "${task.process}":
        fgbio: \$( echo \$(fgbio --version 2>&1 | tr -d '[:cntrl:]' ) | sed -e 's/^.*Version: //;s/\\[.*\$//')
    END_VERSIONS
    """
}It is always good practice to commit regularly while you write the code and comment the commit with a meaningful message. This way, you will always be able to revert the changes at any time.
Fill in the meta.yaml
Once the main module code is written, it is often a good point to fill in the meta.yml file sitting alongside the main.nf of the module.
Here you will document key words, context information about the module, and most importantly document the input and output requirements. In general, it follows a similar shape as the pipeline schema but is no JSON file. At the top you should add the name of the module, a short description and at least three keywords, which describe the module. Afterwards, describe all used tools, usually only one. The main part of the meta.yml should be about the input and output requirements, which follow the same fields as the pipeline schema for a file parameter. For each input and output requirement you have to add a type, a short description about the content and a pattern. The last block contains the authors, who worked on the module, to allow other users to easily reach out to them. If you are the main developer of the module, your GitHub name will be automatically added to the meta.yml. The types in the meta.yml are limited to map, file, directory, string, integer and float. In this example module, the prebuild meta.yml is already filled and the input part looks as follows:
// TODO nf-core: Add a description of all of the variables used as input
input:
  // Only when we have meta
  - meta:
      type: map
      description: |
        Groovy Map containing sample information
        e.g. [ id:'test', single_end:false ]

  // TODO nf-core: Delete / customise this example input
  - bam:
      type: file
      description: BAM/CRAM/SAM file
      pattern: "*.{bam,cram,sam}"
Maps and files as shown above are the two main input / output requirements. For the other input / output types check out the guidelines and other modules.
Lint your code
Now that you’ve completed code development, you are ready to check if your code is clean and up to standards.
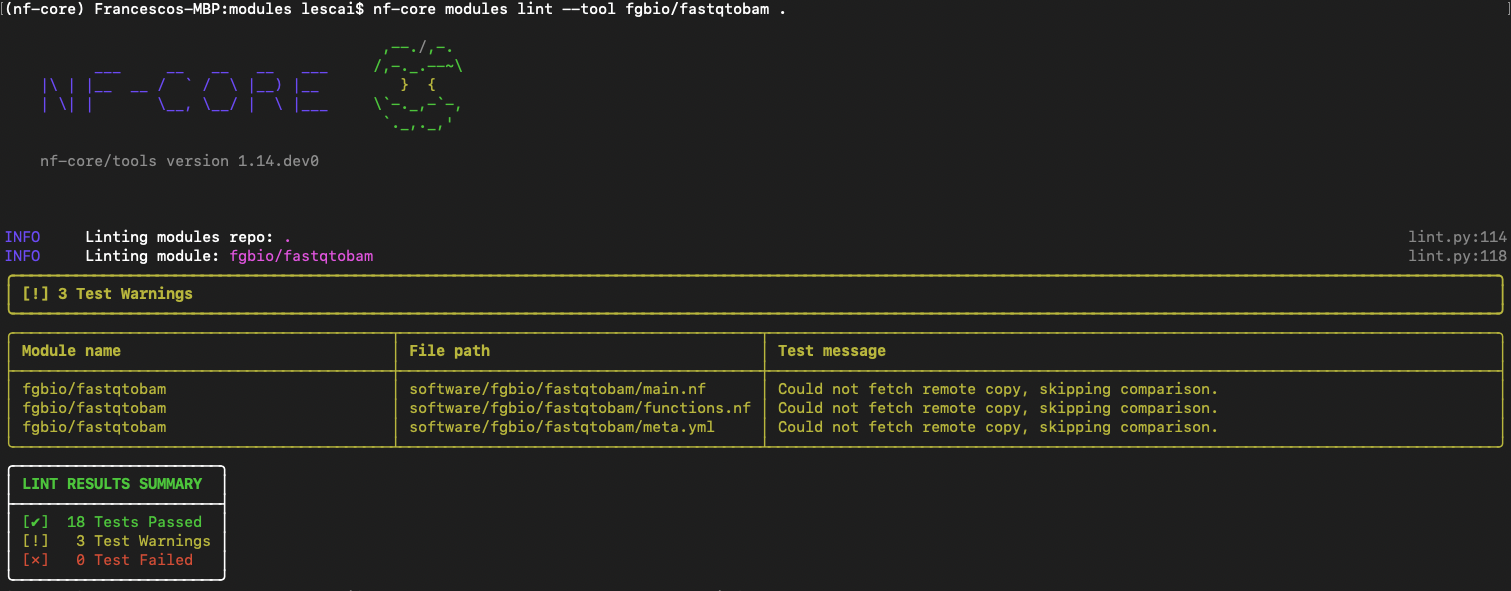
This can also be done easily using nf-core tools just by changing folder into the parent modules directory and typing the command
nf-core modules lint fgbio/demofastqtobamYou will expect no test failed, as shown in figure below:
For more information on fixing linting errors in your code both locally and directly in your pull request in GitHub, check at the end of this subsection here.
Test your code
Once your code is polished, following any suggestions from linting, you should test the code and make sure everything works as expected. This can also be done automatically, using nf-test.
Create a test workflow
As described above, nf-core tools has created already the following files ready for you to modify.
tests
├── modules
│   └── fgbio
│       └── demofastqtobam
│           ├── main.nf
│           ├── nextflow.config
│           └── tests
                ├── main.nf.test
                └── tags.yml
Create a test snapshot
We are using nf-test as our testing framework. You can find more information at nf-test official docs and in this bytesize talk.
Snapshots are a useful tool to prevent unexpected changes in the output of a process or workflow, as described in the docs.
Once all your tests pass successfully, it’s time to submit the module to nf-core/modules!
Create a Pull Request
Back on GitHub, creating a Pull Request is very simple: on the top right of your repository you can click on the link “Pull request” as shown in the figure below:

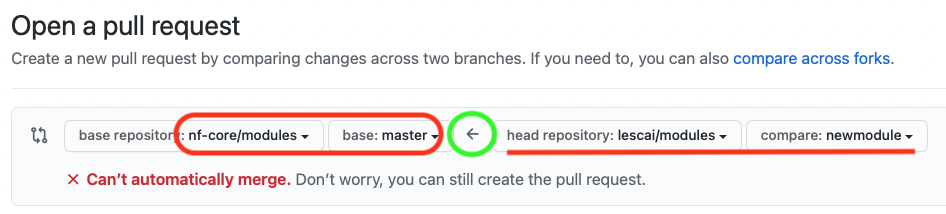
If you have initiated the pull request from your forked repository, the direction of the request should be indicated by the arrow, as in the picture below, i.e. from your fork to the nf-core original repository
You can find more information on the GitHub guide and the nf-core talk Bytesize 4: GitHub contribution basics.
Make sure you are submitting the newly created branch, where your new module has been developed, into the master branch of nf-core modules.
A pull request will be created: Volunteers will review your code and will use comments and requests for changes on GitHub to interact with you and suggest changes if necessary. This is a collaborative and very interesting part of your development work.
Enjoy!